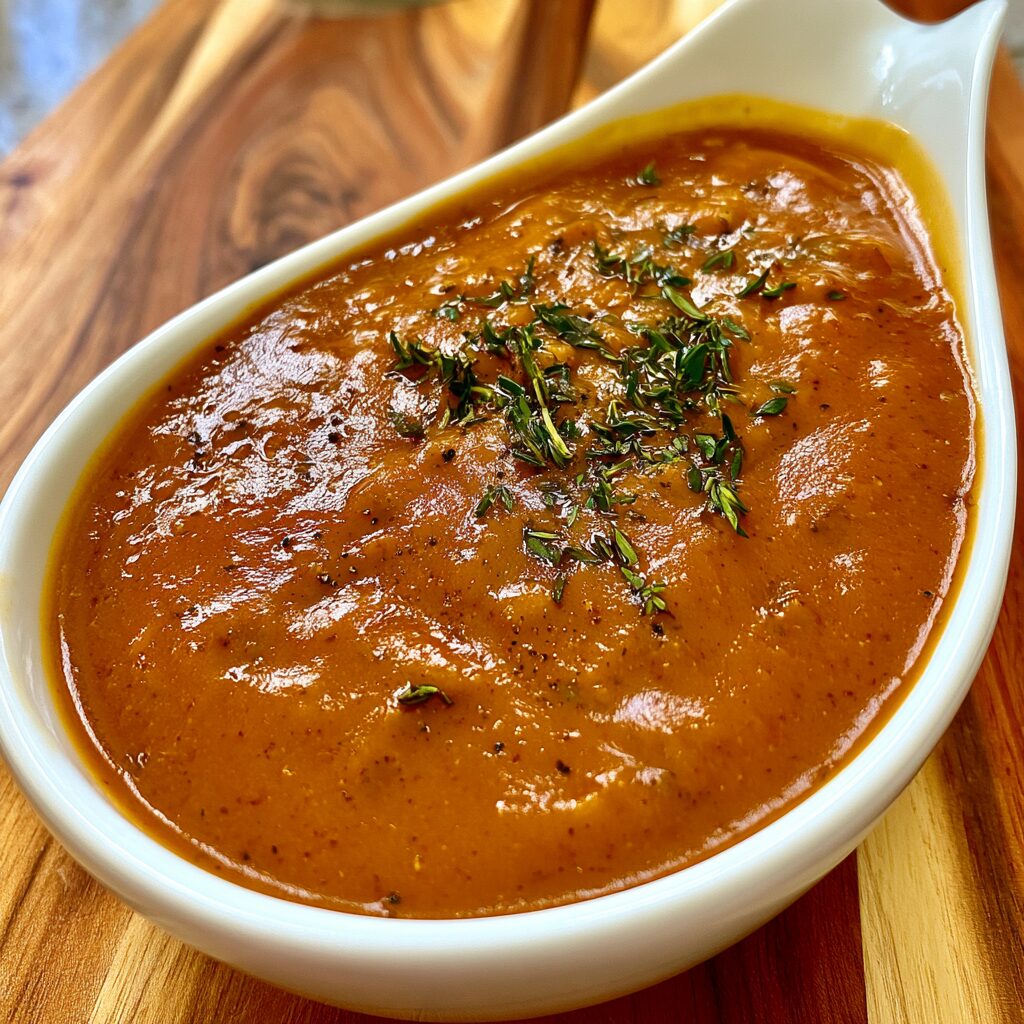
There’s nothing quite like a rich, savory homemade turkey gravy to elevate any meal, especially your Thanksgiving feast. This classic recipe transforms humble pan drippings into a velvety smooth, deeply flavorful sauce that will have everyone reaching for more. It’s the perfect finishing touch to roasted turkey, mashed potatoes, and stuffing.
Imagine a glossy, golden-brown river of pure comfort, coating every bite of your favorite savory dishes with irresistible flavor.
Recipe Details
Flavor Profile: Deeply savory with aromatic hints of garlic, onion, and fresh thyme.
Texture: Velvety smooth and luscious.
Total Active Time: Approximately 15 minutes.
Difficulty Level: Easy – perfect for beginners and seasoned cooks alike.
What You’ll Need
This recipe centers around the precious pan drippings from your roasted turkey, forming the flavor base. We’ll enrich it with butter and flour to create a luscious roux, then whisk in broth and a touch of seasoning to create a truly memorable gravy.
Ingredient Notes
- Pan Drippings: The star of the show! These flavorful liquids left in the roasting pan after cooking your turkey are essential for authentic turkey gravy flavor. Be sure to scrape up any browned bits from the bottom of the pan.
- Unsalted Butter/Turkey Fat: Butter provides richness and helps create a smooth roux. Alternatively, you can use the rendered turkey fat skimmed from your drippings for an even more intense turkey flavor.
- All-Purpose Flour: This is what we’ll use to thicken our gravy, creating that perfect, luscious consistency.
- Chicken or Turkey Broth: Low-sodium broth allows you to control the saltiness of your gravy. Warming the broth helps it incorporate smoothly into the roux.
- Garlic Powder & Onion Powder: These pantry staples add a foundational savory depth without overwhelming the delicate turkey flavor.
- Fresh Thyme: A touch of fresh thyme adds a bright, herbaceous note that complements the richness of the gravy beautifully.
- Salt and Black Pepper: Essential for bringing all the flavors together and adjusting to your personal taste.
Add-ins and Substitutions
- For a Richer Flavor: If you have extra turkey neck or wings, consider simmering them in some water or broth beforehand to create a more concentrated turkey stock to use in place of or in addition to the chicken broth.
- Herb Variations: Feel free to swap the thyme for other complementary fresh herbs like rosemary or sage, finely chopped. A pinch of dried herbs can also be used if fresh is unavailable.
- A Touch of Creaminess: For an extra luxurious gravy, you can whisk in a tablespoon or two of heavy cream or half-and-half at the very end of cooking, just before seasoning.

How to Make Classic Homemade Turkey Gravy
Transforming those flavorful turkey pan drippings into a magnificent gravy is a surprisingly simple process. It all starts with preparing your drippings and building a beautiful roux.
- Prepare the Drippings: First, carefully strain your turkey pan drippings to remove any solids. Then, separate the rendered fat from the flavorful liquid. You’ll want about 2 cups of this liquid for your gravy.
- Create the Roux: In a saucepan, melt your butter or the reserved turkey fat over medium heat. Once melted and shimmering, whisk in the all-purpose flour. Cook this mixture, whisking constantly, for about 2 minutes until it turns a lovely golden-brown color. This is your roux, and it’s key to a smooth, lump-free gravy.
- Combine and Thicken: Gradually whisk in the strained turkey drippings and the warm chicken or turkey broth, a little at a time, ensuring it’s smooth before adding more. Continue whisking until all the liquid is incorporated and the mixture is smooth.
- Add Flavor: Stir in the garlic powder, onion powder, and fresh thyme. Bring the gravy to a gentle simmer.
- Simmer and Thicken: Let the gravy simmer gently for 5 to 7 minutes, stirring often. This allows the flavors to meld and the gravy to reach your desired thickness. If it becomes too thick, you can thin it with a little more warm broth or water. If it’s not thick enough, you can let it simmer a bit longer.
- Pro Tip: Whisking constantly as you add the liquids is crucial for preventing lumps and ensuring a silky smooth gravy.
Recipe Tips
- Don’t Rush the Roux: Cooking the flour and fat together for a couple of minutes is important to get rid of the raw flour taste and develop a nice golden color, which also adds depth of flavor.
- Warm Broth is Best: Using warm broth helps the liquids incorporate seamlessly into the roux, further ensuring a smooth gravy without lumps.
- Stir Regularly: Constant or frequent stirring while the gravy simmers prevents it from scorching on the bottom of the pan and helps it thicken evenly.
- Taste and Adjust: Always taste your gravy before serving and adjust the salt and pepper to your preference. Remember that the pan drippings may already contain salt from seasoning the turkey.
FAQs
- Can I make turkey gravy without pan drippings?
While pan drippings provide the most authentic and rich turkey flavor, you can make a delicious gravy using only broth, butter, flour, and seasonings. You might want to add a little extra poultry seasoning or a touch of soy sauce for added depth if you omit the drippings. - How do I fix lumpy gravy?
If your gravy has lumps, don’t despair! You can often fix it by passing it through a fine-mesh sieve. For stubborn lumps, you can carefully blend the gravy with an immersion blender until smooth, or transfer it to a regular blender (being very careful with hot liquids). - What is the best way to store leftover gravy?
Once completely cooled, store leftover gravy in an airtight container in the refrigerator for up to 3-4 days. It can also be frozen in freezer-safe containers or bags for up to 3 months.
Serving Suggestions
This classic homemade turkey gravy is incredibly versatile and pairs wonderfully with so many dishes:
* Drizzled generously over fluffy mashed potatoes.
* Spoonfuls over moist stuffing or dressing.
* Topping for carved roasted turkey slices.
* Accompanying roasted root vegetables.
* A delightful addition to leftover turkey sandwiches.
Make This Recipe in Advance
You can prepare the roux and combine it with the broth and drippings a day in advance, storing it in an airtight container in the refrigerator. Gently reheat the gravy on the stovetop over medium-low heat, stirring frequently, and add the seasonings. You may need to add a splash more broth or water to reach your desired consistency when reheating. The gravy is best enjoyed fresh, but this make-ahead option can save you time on a busy holiday.
Print
Classic Homemade Turkey Gravy
- Total Time: 25 minutes
- Yield: Approximately 4 cups 1x
Description
Elevate your holiday meals with this classic homemade turkey gravy, deeply savory, wonderfully smooth, and incredibly easy to whip up. The perfect finishing touch for roasted turkey.
Ingredients
Pan drippings from roasted turkey (about 2 cups liquid)
1/4 cup unsalted butter (or turkey fat from drippings)
1/4 cup all-purpose flour
2 cups low-sodium chicken or turkey broth (warm)
1/2 tsp garlic powder
1/2 tsp onion powder
1/2 tsp fresh thyme, chopped
Salt and black pepper to taste
Instructions
Strain your turkey pan drippings, then separate the fat and save the liquid.
Melt butter or turkey fat in a saucepan over medium heat.
Whisk in the flour and cook for 2 minutes to create a golden roux.
Gradually whisk in the strained drippings and warm broth until smooth.
Stir in the garlic powder, onion powder, and thyme, and bring to a gentle simmer.
Cook for 5 to 7 minutes, stirring often, until it reaches your desired thickness.
Season with salt and pepper to your liking before serving.
Notes
Don’t skip straining your pan drippings; it ensures a silky-smooth gravy free from any unwanted bits.
Keep an eye on the roux as it cooks; you want a gentle golden color, not burnt. Burnt roux will impart a bitter flavor to your gravy.
Constant whisking when adding the liquids is crucial to prevent lumps and achieve that lusciously smooth texture.
If your gravy is too thick, thin it with a little more warm broth or water. If it’s too thin, simmer it a bit longer or make a small slurry of flour and water to whisk in.
It’s best to season your gravy with salt and pepper after it has thickened and the flavors have melded, as the pan drippings already contain some salt.
- Prep Time: 10 minutes
- Cook Time: 15 minutes
- Category: Sauce
- Cuisine: American
Nutrition
- Calories: N/A
- Fat: N/A
- Carbohydrates: N/A
- Protein: N/A