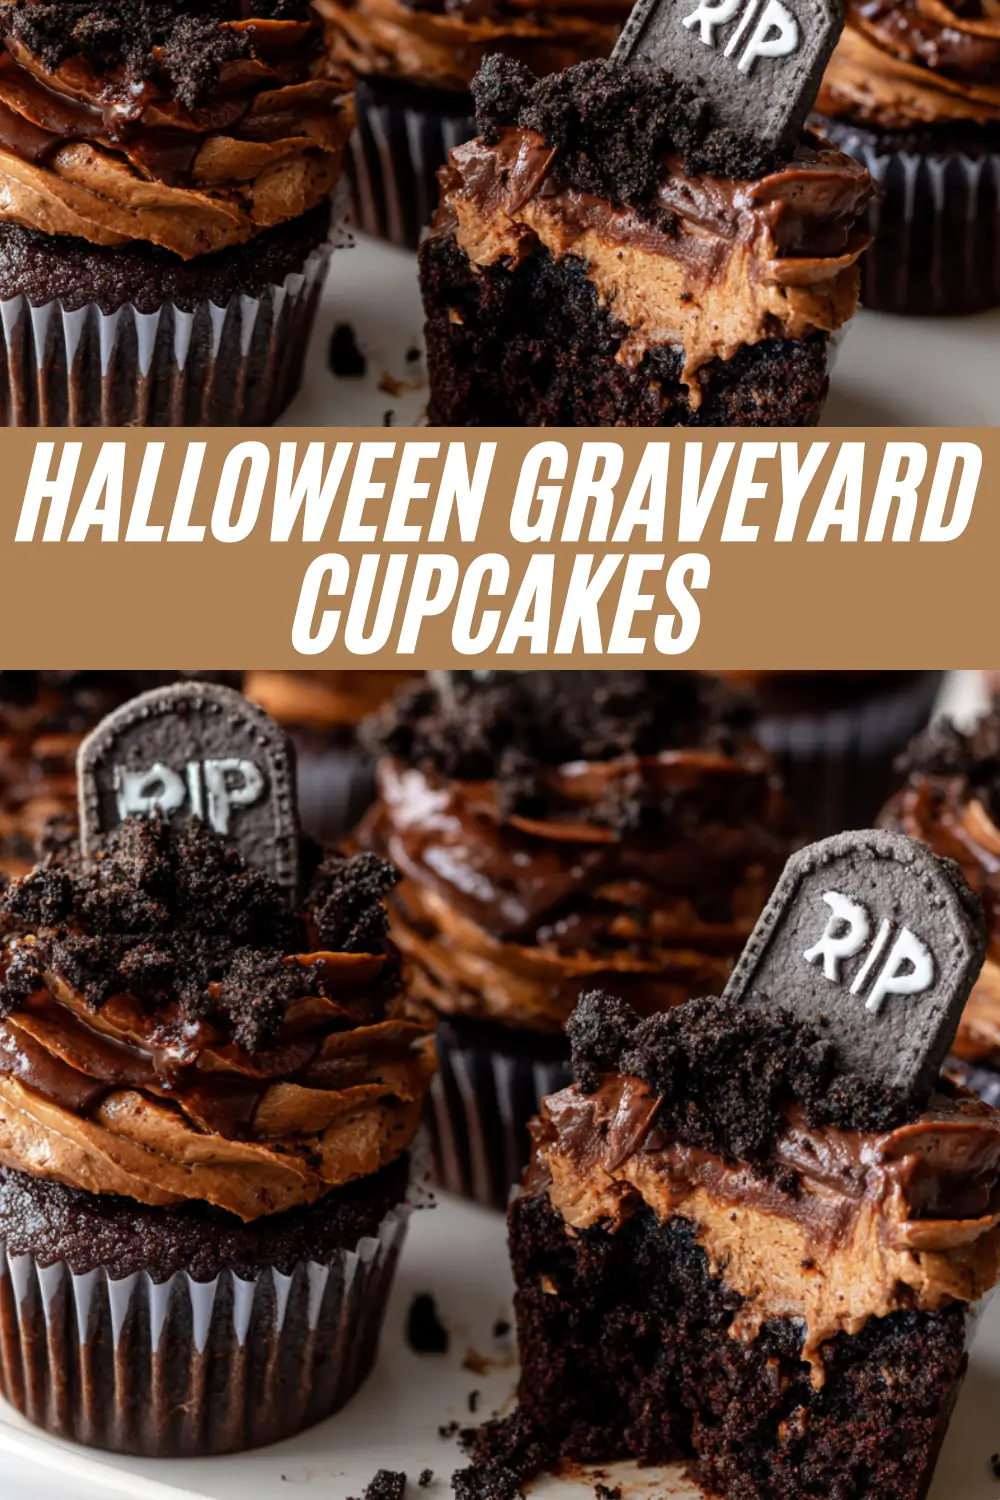
There is a special kind of joy in creating a dessert that tells a story, and these Halloween Graveyard Cupcakes are a perfect, spooky tale on a plate. I’ve always been obsessed with elaborate Halloween treats, and this recipe is the culmination of that passion. It combines a rich, moist chocolate cupcake, a surprise Oreo cheesecake filling, and decadent chocolate buttercream, all decorated to look like a tiny, edible graveyard. They are my go-to for any Halloween party.
What makes this recipe a standout is the incredible detail you can achieve with surprisingly simple techniques. The Biscoff cookie “tombstones” add a wonderful spiced flavor, and the crushed Oreo “soil” gives a delightful crunch. But the best part? That optional, hidden pocket of Oreo cheesecake filling inside the cupcake. It’s a surprise that takes these from a simple treat to a truly gourmet experience.
The Ingredients You’ll Need
For the biscuit graves
- 12 Lotus Biscoff cookies
- 5.5 ounces Dark Chocolate (about 1 cup of chips), melted
- 1 ounce White Chocolate (about 3 tablespoons of chips), melted
For the cupcakes
- ¾ cup plus 2 tablespoons Unsalted Butter, softened (14 tablespoons total)
- ¾ cup plus 2 tablespoons Granulated Sugar
- 3 large Eggs
- 2 tablespoons Milk
- 1 ¼ cups All-Purpose Flour*
- ¼ cup Unsweetened Cocoa Powder
- 1 ¾ teaspoons Baking Powder*
- ¼ teaspoon Salt*
For the oreo cheesecake filling (optional)
- ½ cup (4 ounces) Full-Fat Cream Cheese, softened
- 2 tablespoons Powdered Sugar
- 2 tablespoons Crushed Oreos (about 2 cookies)
- ⅛ teaspoon Vanilla Extract
For the chocolate buttercream
- 7 tablespoons Unsalted Butter, softened
- 1 ⅓ cups Powdered Sugar
- ¼ cup plus 1 tablespoon Unsweetened Cocoa Powder
- 1-2 teaspoons Milk
For the oreo soil
-
¼ cup Crushed Oreos (about 4 cookies)
Assembling Your Spooky Graveyard
Step 1: Craft the Cookie Tombstones
First, let’s make the headstones. Dip the bottom half of each Biscoff cookie into the melted dark chocolate and place them on a parchment-lined tray to set. While they’re setting, transfer the melted white chocolate into a small piping bag. Once the dark chocolate is firm, pipe “RIP” onto the top of each cookie tombstone. Set them aside to dry completely.
Step 2: Bake the Chocolate Cupcakes
Preheat your oven to 325°F (160°C) and line a muffin tin with 12 cupcake liners. In a large bowl, cream the softened butter and sugar together until light and fluffy. Beat in the eggs one at a time, followed by the milk. In a separate bowl, whisk together the flour, cocoa powder, baking powder, and salt. Gradually add the dry ingredients to the wet ingredients, mixing until just combined. Fill each liner about two-thirds full and bake for 20-22 minutes.
Step 3: Prepare the Fillings and Frosting
While the cupcakes cool, prepare the optional cheesecake filling by mixing the cream cheese, powdered sugar, crushed Oreos, and vanilla until smooth. For the buttercream, beat the softened butter until creamy, then gradually add the powdered sugar and cocoa powder. Add the milk one teaspoon at a time until you reach a smooth, spreadable consistency.
Step 4: Assemble Your Graveyard Scene
Once the cupcakes are completely cool, use an apple corer or a small knife to hollow out the center of each one. Fill the cavity with the Oreo cheesecake mixture. Frost the top of each cupcake with the chocolate buttercream. Finally, sprinkle the crushed Oreo “soil” over the buttercream and gently press a cookie tombstone into the back of each cupcake to complete your spooky scene.
My Best Tips for These Graveyard Cupcakes
My Secret to Perfect “Soil”
For the most realistic-looking dirt, I like to use a mix of finely crushed Oreos and a few larger, chunkier crumbs. The fine crumbs create the base layer of soil, while the bigger pieces look like little rocks and add great texture. It’s a small detail that makes a big visual impact.
Keep Your Tombstones Standing
To ensure your cookie tombstones stand tall and don’t fall over, make sure your buttercream is on the stiffer side. If it feels too soft, you can add a little more powdered sugar to thicken it up. When you press the cookie in, push it down deep enough so that the frosting provides a solid, supportive base.
For an Even Spookier Look
I love to add a few final touches to my graveyard scene. A single gummy worm crawling out from the “soil” in front of the tombstone looks wonderfully creepy. You can also use a bit of green-tinted frosting piped with a grass tip to create little patches of “moss” at the base of the tombstone.
Ghoulishly Good Variations
This recipe is a fantastic base for all kinds of spooky creativity. Instead of Biscoff cookies, you can use Milano cookies or any other rectangular cookie for the tombstones. If you want to add more character, use a small amount of green-tinted buttercream to pipe little tufts of grass around the tombstone. For a final touch, a small candy pumpkin placed next to the grave adds a perfect pop of color and festive flair.
FAQs
Can I make these cupcakes ahead of time?
Yes! The cupcakes can be baked and stored in an airtight container at room temperature a day in advance. The buttercream can also be made ahead and stored in the fridge. For the best results, I recommend frosting and assembling the cupcakes on the day you plan to serve them so the cookies stay crisp.
Is the cheesecake filling necessary?
Not at all! The cheesecake filling is a delicious optional surprise, but the cupcakes are incredibly moist and flavorful on their own. If you’re short on time or prefer a simpler treat, you can absolutely skip this step.
What if I don’t have a piping bag for the tombstone writing?
No problem! A simple and effective DIY solution is to use a small zip-top plastic bag. Just spoon the melted white chocolate into the bag, press it into one corner, and snip off a tiny bit of the tip. This gives you great control for writing the “RIP” on your cookies.
Print
Halloween Graveyard Cupcakes
- Total Time: 90
- Yield: 12 cupcakes 1x
Description
Create a spooky and delicious tale with these Halloween Graveyard Cupcakes. This recipe features a moist chocolate cupcake with a surprise Oreo cheesecake filling, topped with rich chocolate buttercream, crushed Oreo “soil,” and a Biscoff cookie “tombstone.” These impressive-looking treats are the perfect centerpiece for any Halloween celebration.
Ingredients
For the biscuit graves
12 Lotus Biscoff cookies
5.5 ounces Dark Chocolate, melted
1 ounce White Chocolate, melted
For the cupcakes
¾ cup plus 2 tablespoons Unsalted Butter, softened
¾ cup plus 2 tablespoons Granulated Sugar
3 large Eggs
2 tablespoons Milk
1 ¼ cups All-Purpose Flour
¼ cup Unsweetened Cocoa Powder
1 ¾ teaspoons Baking Powder
¼ teaspoon Salt
For the oreo cheesecake filling (optional)
½ cup (4 ounces) Full-Fat Cream Cheese, softened
2 tablespoons Powdered Sugar
2 tablespoons Crushed Oreos
⅛ teaspoon Vanilla Extract
For the chocolate buttercream
7 tablespoons Unsalted Butter, softened
1 ⅓ cups Powdered Sugar
¼ cup plus 1 tablespoon Unsweetened Cocoa Powder
1–2 teaspoons Milk
For the oreo soil
¼ cup Crushed Oreos
Instructions
Craft the Cookie Tombstones:
Dip the bottom half of each Biscoff cookie into the melted dark chocolate and place them on a parchment-lined tray. Once the chocolate is firm, use a piping bag with melted white chocolate to pipe “RIP” on the top of each cookie. Set aside to dry completely.
Bake the Chocolate Cupcakes:
Preheat oven to 325°F (160°C) and line a muffin tin. Cream the butter and sugar until fluffy. Beat in the eggs and milk. In a separate bowl, whisk the dry ingredients, then gradually add them to the wet ingredients, mixing until just combined. Fill liners two-thirds full and bake for 20-22 minutes. Let cool completely.
Prepare the Fillings and Frosting:
For the optional filling, mix the cream cheese, powdered sugar, crushed Oreos, and vanilla until smooth. For the buttercream, beat the butter until creamy, then gradually add the powdered sugar and cocoa powder. Add milk one teaspoon at a time until you reach a smooth, spreadable consistency.
Assemble Your Graveyard Scene:
Core the center of each cooled cupcake and fill it with the Oreo cheesecake mixture. Frost the top with chocolate buttercream. Sprinkle crushed Oreo “soil” over the frosting and press a cookie tombstone into the back of each cupcake.
Notes
Make-Ahead Friendly:
You can bake the cupcakes a day in advance and store them in an airtight container. The buttercream can also be made ahead and refrigerated. For best results, assemble the cupcakes on the day of serving to keep the cookie tombstones crisp.
Extra Spooky Touches:
Enhance your graveyard scene by adding a gummy worm crawling out of the “soil” or by piping small tufts of green-tinted frosting at the base of the tombstone to look like moss.
Alternative Tombstones:
If you don’t have Biscoff cookies, Milano cookies or other rectangular shortbread cookies make excellent substitutes for the tombstones.
- Prep Time: 30
- Cook Time: 22
- Category: Dessert
- Method: Baking
- Cuisine: American
Nutrition
- Serving Size: 1 cupcake
- Calories: 515
- Sugar: 50g
- Sodium: 180mg
- Fat: 31g
- Saturated Fat: 18g
- Unsaturated Fat: 10g
- Carbohydrates: 56g
- Fiber: 3g
- Protein: 6g
- Cholesterol: 105mg
Keywords: graveyard cupcakes, Halloween cupcakes, chocolate cupcakes, Halloween dessert, Oreo cheesecake filling, Biscoff cookie tombstones, spooky treats