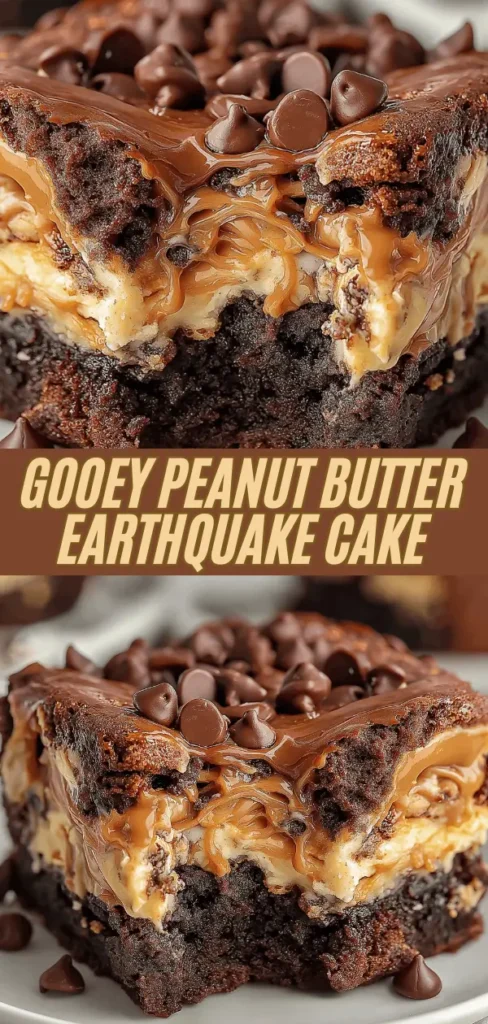
This Gooey Peanut Butter Earthquake Cake is a chocolate lover’s dream, featuring a rich cocoa base that “cracks” during baking to reveal a molten peanut butter and cream cheese center. It’s called an earthquake cake because of the beautiful, cratered surface that forms as the dense filling sinks into the fluffy cake, creating delicious faults and fissures throughout.
Perfect for potlucks or family gatherings, this dessert is surprisingly simple to put together since it starts with a convenient cake mix base. The combination of salty peanut butter and sweet semi-sweet chocolate is a classic pairing that reaches new heights in this warm, decadent format.
Recipe Details
- Flavor Profile: Deeply chocolatey with a salty-sweet peanut butter punch and a tangy, cheesecake-like finish.
- Textures: A trifecta of textures featuring a light cake exterior, a fudgy molten center, and a slight crunch from chocolate chips.
- Total Time: Approximately 10 minutes of prep plus 40–45 minutes of baking.
- Difficulty Level: Very Easy; a simple “dump and swirl” method.
What You’ll Need
To bake this masterpiece, you will start with one box of your favorite chocolate cake mix along with the standard ingredients listed on the back (usually eggs, oil, and water). The rich “earthquake” filling is created using a combination of 8 oz of softened cream cheese, 1/2 cup of peanut butter, and 1/2 cup of melted butter. To give the filling its signature fudge consistency, you will need 4 cups of powdered sugar and 1/2 teaspoon of vanilla extract, topped off with 1/2 cup of semi-sweet chocolate chips.
Ingredient Notes
- Chocolate Cake Mix – Any standard chocolate, devil’s food, or fudge cake mix (approx. 15.25 oz) will work perfectly for the base.
- Softened Cream Cheese – It is vital that your cream cheese is at room temperature before you start; this ensures the peanut butter filling is completely smooth and free of lumps.
- Peanut Butter – A creamy, standard peanut butter is recommended for the smoothest “lava” effect, though you can use crunchy if you prefer extra texture.
- Powdered Sugar – Using 4 cups of powdered sugar provides the structure needed for the filling to sink and create those iconic earthquake fissures.
- Semi-Sweet Chocolate Chips – These are sprinkled on top to provide a dark, rich contrast to the sweet peanut butter pockets.
Add-ins and Substitutions
- Nuts – If you enjoy a bit more crunch, you can sprinkle 1/2 cup of chopped pecans or walnuts into the pan before pouring the cake batter.
- Chocolate Variety – Swap the semi-sweet chips for peanut butter chips or milk chocolate chips for an even sweeter profile.
- Swirls – For a different look, you can add a drizzle of caramel sauce over the top before the cake goes into the oven.
How to Make Gooey Peanut Butter Earthquake Cake
1. Prepare the Cake Base Preheat your oven to 350 F (175 C). Grease a 9×13-inch baking pan thoroughly. Prepare the chocolate cake mix according to the package directions, usually by combining it with the water, oil, and eggs specified on the box. Pour the prepared batter evenly into your baking pan.
2. Mix the Creamy Filling In a large bowl, use a hand mixer to beat the 8 oz of softened cream cheese until it is smooth and light. Add the 1/2 cup of melted butter, the 1/2 cup of peanut butter, and 1/2 teaspoon of vanilla extract. Mix on medium speed until the ingredients are well-combined.
3. Thicken the Filling Gradually blend in the 4 cups of powdered sugar, mixing well after each addition. The resulting peanut butter filling should be thick, creamy, and spreadable.
4. Create the “Earthquake” Dollop the peanut butter mixture over the raw cake batter in the baking pan. Use a butter knife to gently swirl the cream cheese mixture into the cake batter. You aren’t looking for a perfect blend; instead, aim for thick streaks and pockets of peanut butter throughout the chocolate. Sprinkle the 1/2 cup of semi-sweet chocolate chips evenly over the entire top of the cake.
5. Bake to Perfection Place the pan in the oven and bake for 40–45 minutes. You are looking for a cake that is set around the edges but still remains slightly gooey in the center.
6. Cool and Serve Allow the cake to cool in the pan for at least 15 minutes before serving. This rest period is essential for the gooey center to set just enough to be scooped. Serve it warm for the ultimate molten experience, or let it cool completely if you prefer cleaner, firmer slices.
Pro Tip: Do not over-swirl! The beauty of an earthquake cake comes from the distinct “fault lines” of peanut butter filling. If you mix it too much, it will simply become a peanut-butter-flavored cake rather than a pocketed earthquake cake.
Recipe Tips
- Room Temp Ingredients – In addition to the cream cheese, try to have your eggs and peanut butter at room temperature. This helps the batter and filling emulsify perfectly.
- Pan Preparation – Because this cake is very gooey, consider lining your pan with parchment paper if you plan to lift the entire cake out for slicing.
- Testing for Doneness – Since the center is supposed to be gooey, a toothpick test won’t work in the middle. Instead, look for the cake edges to slightly pull away from the sides of the pan.
FAQs
Can I use a different cake flavor? Yes! Yellow cake or white cake mix can be used for a “Peanut Butter & Vanilla” version, though the chocolate base is the traditional earthquake choice.
Why did my cake sink so much? That is actually the goal! The heavy filling is designed to sink into the light batter, causing the cake to “collapse” and form the cracks that give the recipe its name.
How do I store leftovers? Store leftovers in an airtight container. Because of the cream cheese filling, it is best to keep this cake in the refrigerator for up to 4 days. You can reheat individual slices in the microwave for 10–15 seconds to restore that gooey texture.
Serving Suggestions
- Ice Cream – Serve a warm slice with a large scoop of vanilla or chocolate ice cream.
- Milk – This rich cake is the perfect partner for a tall, cold glass of milk.
- Whipped Cream – A dollop of unsweetened whipped cream can help balance the intense sweetness of the peanut butter pockets.
Make This Recipe in Advance
You can prepare the peanut butter filling up to 24 hours in advance and store it in the fridge. However, wait to mix the cake batter and assemble the layers until you are ready to bake. This ensure the cake mix maintains its lift, resulting in the best contrast between the fluffy cake and the dense peanut butter “fault lines.”
Print
Gourmet Peanut Butter Earthquake Cake
- Total Time: 55 minutes
- Yield: 12–15 Servings 1x
- Diet: Vegetarian
Description
This Gourmet Peanut Butter Earthquake Cake is a chocolate lover’s dream. Featuring a rich cocoa base that ‘cracks’ during baking to reveal a molten peanut butter and cream cheese center, it creates a beautiful, cratered surface with salty-sweet ‘lava’ pockets and a decadent fudgy texture.
Ingredients
The Chocolate Base
- 1 box chocolate cake mix (plus eggs, oil, and water per package)
The ‘Earthquake’ Filling
- 8 oz cream cheese, softened
- 1/2 cup creamy peanut butter
- 1/2 cup (1 stick) butter, melted
- 4 cups powdered sugar
- 1/2 teaspoon vanilla extract
The Topping
- 1/2 cup semi-sweet chocolate chips
Instructions
Base: Preheat oven to 350°F. Grease a 9×13 pan. Prepare cake mix per box and pour into pan.
Filling: Beat softened cream cheese until smooth. Add melted butter, peanut butter, and vanilla. Mix well.
Thicken: Gradually blend in powdered sugar until a thick paste forms.
Swirl: Drop dollops of the peanut butter mix over the raw batter. Use a knife to create thick streaks (do not over-mix).
Bake: Top with chocolate chips. Bake for 40–45 mins until edges are set. Rest for 15 mins before serving warm.
Notes
Don’t Over-Swirl: The ‘earthquake’ effect depends on heavy pockets of filling sinking through the batter. Excessive mixing will blend the textures.
Room Temperature: Cold cream cheese will leave white lumps that won’t melt away.
The ‘Jiggle’ Factor: A toothpick test will fail because of the gooey center; check for the cake edges pulling away from the pan instead.
- Prep Time: 10 minutes
- Cook Time: 45 minutes
- Category: Dessert
- Method: Baking / Swirling
- Cuisine: American Comfort
Nutrition
- Serving Size: 1 Square
- Calories: 520
- Sugar: 54g
- Sodium: 410mg
- Fat: 28g
- Saturated Fat: 14g
- Unsaturated Fat: 14g
- Trans Fat: 0.5g
- Carbohydrates: 68g
- Fiber: 2g
- Protein: 6g
- Cholesterol: 65mg
Keywords: peanut butter earthquake cake, chocolate peanut butter dump cake, gooey cream cheese cake, chocolate lava cake, easy potluck desserts, peanut butter swirl cake