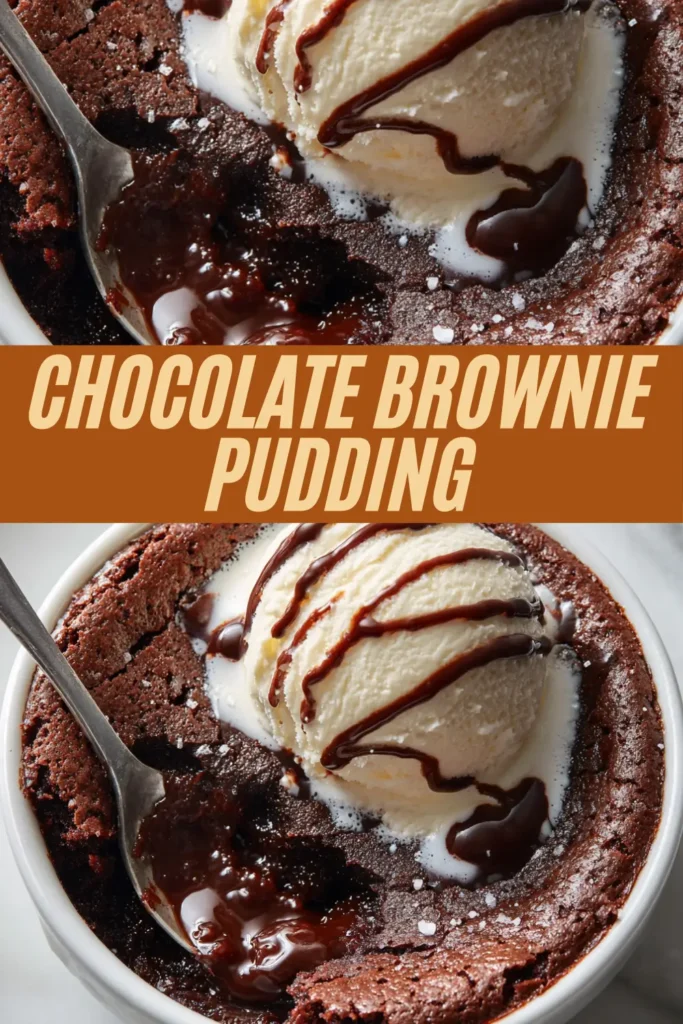
This Chocolate Brownie Pudding is the ultimate dessert for any chocolate lover! It’s deeply rich, intensely fudgy, and baked to a perfect spoonable consistency that bridges the gap between a dense, moist brownie and a smooth, silky pudding. This easy recipe uses simple pantry staples to deliver a show-stopping skillet dessert that everyone will adore.
Serve this warm, comforting Chocolate Brownie Pudding right out of the skillet, topped with a generous scoop of vanilla ice cream for a blissful contrast of temperatures and textures.
Recipe Details
- Flavor Profile: Intense, rich, and deeply satisfying chocolate flavor balanced by the sweetness of sugar and the optional depth from coffee extract. It’s an elevated, dark chocolate experience that feels luxurious.
- Texture: Wonderfully fudgy, dense, and exceptionally moist, achieving a distinctively spoonable, custard-like texture in the center when cooled truly living up to its “pudding” name.
- Total Time: The active prep time is quick, about 15 minutes, followed by 60 minutes of required baking time and essential cooling time in the fridge.
- Difficulty: Easy. The main steps involve properly whipping the eggs and sugar to build volume, and then carefully baking the batter using a traditional water bath (bain-marie) technique.
What You’ll Need
This brownie pudding recipe relies on classic baking components to achieve its unique, fudgy texture. We start with a base of melted butter and standard dry ingredients (flour and dutch cocoa powder). The real magic comes from whipping large eggs with white sugar to create a light, voluminous base, which is then blended with vanilla and optional coffee extract for deep, complex chocolate flavor. It is finished with a crucial cooling period and is best served with vanilla ice cream.
Ingredient Notes
- Unsalted Butter – Using unsalted butter allows you to control the total amount of salt in the recipe. Make sure to melt it completely and let it cool slightly before incorporating it into the batter to prevent cooking the eggs.
- Dutch Cocoa Powder – This type of cocoa powder has been treated with alkali, giving it a darker color and a milder, less bitter chocolate flavor, which is essential for achieving the rich, dark hue and deeply fudgy pudding texture.
- Eggs – These are key to the pudding’s structure and lightness. Whipping them thoroughly with the sugar for the full time is crucial for incorporating enough air to achieve the desired light and thick base.
- Coffee Extract (Optional) – A touch of coffee extract (or even a pinch of espresso powder) enhances the chocolate flavor without making the dessert taste overtly like coffee, intensifying the richness and depth.
Add-ins and Substitutions
- For Added Texture: Feel free to gently fold in 1/2 cup of chocolate chips (dark or semi-sweet are best) at the very end, just before pouring the batter into the skillet.
- Serving Variation: Instead of vanilla ice cream, this pudding is fantastic served with fresh raspberries, a dusting of powdered sugar, or a dollop of fresh whipped cream.
- Extracts: If you don’t have coffee extract, you can skip it completely, or substitute it with an equal amount of almond extract for a subtle flavor twist.
How to Make Chocolate Brownie Pudding
This ultimate chocolate skillet dessert is surprisingly simple to pull together, but the method for achieving that signature fudgy, pudding-like center is unique and requires attention to detail.
- Prep the Oven and Ingredients: First, preheat your oven to 325 degrees F. Lightly grease the inside of a 9-inch skillet with butter. Next, melt the 1 cup of unsalted butter and set it aside to cool completely. In a separate bowl, sift the 3/4 cup of dutch cocoa powder and 1/2 cup of all-purpose flour together, then set the mixture aside.
- Whip the Egg Base: In your mixer, combine the 4 large eggs and 2 cups of white sugar. Beat this mixture on medium-high speed for a full 5 to 10 minutes until it becomes very thick, voluminous, and pale light yellow.
- Combine Wet and Dry: After the 10 minutes of whipping, reduce the mixer speed to low. Add the 3 teaspoons of vanilla extract, the 2 teaspoons of optional coffee extract, and the sifted cocoa powder and flour mixture. Mix very slowly, only until everything is just combined.
- Add Cooled Butter: Slowly pour in the cooled melted butter. Mix again on low speed just until the butter is fully incorporated and the batter is homogeneous. Pro Tip: Do not overmix the batter at this stage! Overmixing will develop the gluten in the flour and ruin the rich, fudgy, pudding-like texture we are aiming for. Mix only until the butter disappears into the batter.
- Bake in a Water Bath: Pour the finished mixture into the prepared 9-inch skillet. Place the skillet into a larger baking pan. Add warm water to the larger pan until the water level comes halfway up the side of the skillet. Carefully place the entire setup into the preheated oven, making sure not to slosh the water around, and bake for 60 minutes.
- Cool and Serve: When it’s time to take it out don’t fear it’s absolutely going to look like it’s under-baked. This super-soft appearance is normal! Remove the skillet from the water and place it directly into the fridge to cool completely. Serve the chilled or slightly cooled pudding in the skillet with vanilla ice cream on the side.
Recipe Tips
- Achieve Volume in the Eggs: Do not rush the egg and sugar whipping step. Beating them for the full 5 to 10 minutes on medium-high speed is the key to creating the proper aeration and structure needed for this dense, yet tender, pudding.
- Temperature Matters: Ensure your melted butter has cooled before you add it to the batter. If it’s hot, it can scramble the eggs and ruin the final texture.
- The Power of the Water Bath: The water bath (or bain-marie) is essential. It prevents the edges from setting too quickly and creates a moist, gentle cooking environment, which is necessary for the smooth, creamy, pudding-like interior.
- Cool Completely: The cooling period in the refrigerator is mandatory. This allows the hot, loose pudding to set up and become that signature dense, incredibly fudgy texture. It’s not ready until it’s properly chilled.
FAQs
- Q: Why does the recipe call for sifting the cocoa powder and flour? A: Sifting prevents lumps from forming, especially with fine powders like cocoa. This ensures a smooth, even texture throughout your batter and prevents pockets of dry ingredients in the finished pudding.
- Q: Can I use a baking dish instead of a skillet? A: Yes, you can use a 9-inch round or square baking dish as long as it is oven-safe and can fit inside a larger baking pan for the water bath. Just ensure the sides are deep enough to accommodate the mixture.
- Q: How long does Chocolate Brownie Pudding last in the fridge? A: Once completely cooled, cover the skillet tightly with plastic wrap and store it in the refrigerator for up to 3 days. The flavor actually deepens a bit the next day!
Serving Suggestions
- Ice Cream: Classic vanilla ice cream is the absolute perfect pairing, offering a cooling, creamy contrast to the rich, intense chocolate.
- Fresh Fruit: A colorful burst of fresh berries, such as raspberries, blueberries, or strawberries, provides a slight acidity that cuts through the richness beautifully.
- Sauces: Drizzle a little caramel sauce or a raspberry coulis over the top right before serving.
- A Simple Finish: For a minimalist touch, simply dust the cooled pudding with a little powdered sugar or additional cocoa powder.
Make This Recipe in Advance
This Chocolate Brownie Pudding is an ideal make-ahead dessert! Because the process requires a full cooling period in the fridge, you can easily bake it and cool it up to 1 day in advance. Simply cover the chilled skillet tightly and keep it refrigerated until about 30 minutes before you plan to serve it. This allows the pudding to come slightly closer to room temperature for the best flavor and texture, though it should still be served cool.

Chocolate Brownie Pudding (Fudgy Skillet Dessert)
- Total Time: 75 minutes
- Yield: 8 servings 1x
- Diet: Vegetarian
Description
This Chocolate Brownie Pudding is the ultimate dessert for any chocolate lover! It’s deeply rich, intensely fudgy, and baked to a perfect spoonable consistency that bridges the gap between a dense, moist brownie and a smooth, silky pudding. This easy recipe uses simple pantry staples to deliver a show-stopping skillet dessert that everyone will adore. Serve it warm, right out of the pan, topped with vanilla ice cream for a blissful contrast.
Ingredients
For the Chocolate Brownie Pudding
- 1 cup unsalted butter
- 4 large eggs
- 2 cups white sugar
- 3/4 cup dutch cocoa powder
- 1/2 cup all purpose flour
- 3 teaspoon vanilla extract
- 2 teaspoons coffee extract (optional)
For Serving
- Vanilla ice cream for serving
Instructions
Step 1: Prep the Oven and Ingredients
First, preheat your oven to 325°F. Lightly grease the inside of a 9-inch skillet with butter. Next, melt the 1 cup of unsalted butter and set it aside to cool completely. In a separate bowl, sift the 3/4 cup of dutch cocoa powder and 1/2 cup of all-purpose flour together, then set the mixture aside.
Step 2: Whip the Egg Base
In your mixer, combine the 4 large eggs and 2 cups of white sugar. Beat this mixture on medium-high speed for a full 5 to 10 minutes until it becomes very thick, voluminous, and a pale light yellow.
Step 3: Combine Wet and Dry
After the 10 minutes of whipping, reduce the mixer speed to low. Add the 3 teaspoons of vanilla extract, the 2 teaspoons of optional coffee extract, and the sifted cocoa powder and flour mixture. Mix very slowly, only until everything is just combined.
Step 4: Add Cooled Butter
Slowly pour in the cooled melted butter. Mix again on low speed just until the butter is fully incorporated and the batter is homogeneous. Pro Tip: Do not overmix the batter at this stage! Mix only until the butter disappears into the batter to preserve the rich, fudgy, pudding-like texture.
Step 5: Bake in a Water Bath
Pour the finished mixture into the prepared 9-inch skillet. Place the skillet into a larger baking pan. Add warm water to the larger pan until the water level comes halfway up the side of the skillet. Carefully place the entire setup into the preheated oven and bake for 60 minutes.
Step 6: Cool and Serve
The pudding will look under-baked and very soft when it comes out this is normal! Remove the skillet from the water and place it directly into the fridge to cool completely. Serve the chilled or slightly cooled pudding in the skillet, best enjoyed with a scoop of vanilla ice cream on the side.
Notes
Make-Ahead & Storage: This dessert is ideal for making ahead. Once completely cooled, cover the skillet tightly with plastic wrap and store it in the refrigerator for up to 3 days. The flavor actually deepens a bit the next day.
Achieve Maximum Volume: Do not rush the egg and sugar whipping step. Beating them for the full 5 to 10 minutes on medium-high speed is the key to creating the proper aeration and light structure needed for this dense, yet tender, pudding.
Serving Variation: For added texture, gently fold in 1/2 cup of dark or semi-sweet chocolate chips at the very end before pouring the batter into the skillet. Alternatively, serve with fresh raspberries or a dusting of powdered sugar instead of ice cream.
- Prep Time: 15 minutes
- Cook Time: 60 minutes
- Category: Dessert
- Method: Baking
- Cuisine: American
Nutrition
- Serving Size: 1/8 of recipe
- Calories: 429
- Sugar: 36g
- Sodium: 240mg
- Fat: 25g
- Saturated Fat: 15g
- Unsaturated Fat: 10g
- Trans Fat: 0g
- Carbohydrates: 46g
- Fiber: 2g
- Protein: 6g
- Cholesterol: 45mg
Keywords: chocolate brownie pudding, fudgy dessert, skillet dessert, water bath recipe, easy baking, chocolate lover, make ahead dessert