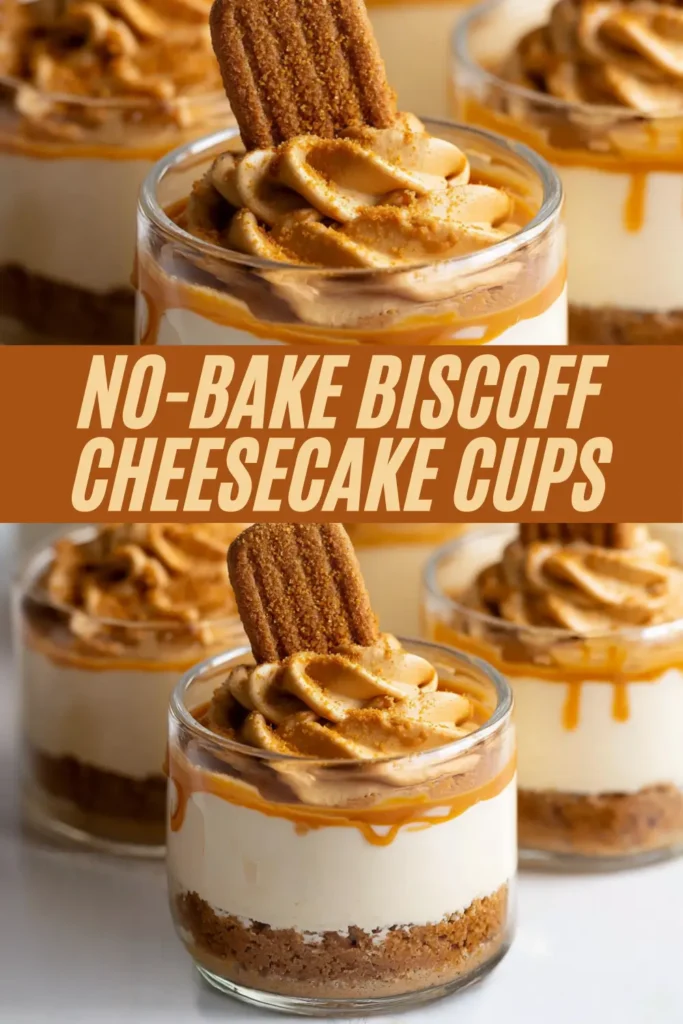
If you’re seeking a simple, stunning dessert that requires zero oven time and delivers maximum flavor, these No-Bake Biscoff Cheesecake Cups are your answer! The irresistible spiced caramel notes of Biscoff (Lotus Speculoos) cookies and spread are infused throughout this creamy, light, and perfectly portioned treat.
These individual dessert cups feature a crunchy spiced cookie crust, a velvety-smooth Biscoff-flavored cheesecake filling, and a gooey, liquid Biscoff drizzle a delightful combination that’s ready in minutes.
Recipe Details
- Flavor Profile: Sweet, warmly spiced (cinnamon and ginger notes from the Biscoff cookies), and deeply rich with caramel undertones.
- Texture: A fantastic contrast between the firm, buttery crumb base and the light, airy, mousse-like cheesecake filling. The liquid Biscoff topping adds another layer of smooth decadence.
- Total Active Time: Approximately 15–20 minutes. Requires a minimum of 4 hours of chilling time to properly set.
- Difficulty Level: Easy. This recipe is a perfect starter dessert, involving simple mixing, folding, and a generous amount of chilling time.
What You’ll Need
This recipe is built in three simple layers: the crunchy cookie base, the rich and airy cheesecake filling, and the final liquid Biscoff garnish, all made using basic kitchen tools like bowls and a whisk.
Ingredient Notes
A few pointers on the key ingredients to ensure your Biscoff Cheesecake Cups turn out perfectly creamy and well-set.
- Biscoff Biscuits – These are essential for the signature flavor. Make sure they are crushed very finely for a solid base that holds together well.
- Cream Cheese – It is vital that your cream cheese is at room temperature. This allows it to whip up lump-free and combine seamlessly with the other filling ingredients.
- Heavy Cream – Use heavy whipping cream (16 oz or 2 cups) and ensure it is cold before whipping. This is crucial to forming stiff peaks, which gives the cheesecake filling its structure and light, fluffy texture.
- Biscoff Spread – This spread is the main source of the spiced caramel flavor. You will use it in both the filling and as a final, molten topping.
Add-ins and Substitutions
You can easily adjust these cups to your taste preferences without modifying the core no-bake method:
- Lighter Filling – While not recommended for the absolute best set, you could slightly lighten the filling by substituting a portion of the cream cheese with plain Greek yogurt (but keep the heavy cream for stability).
- Spice Boost – If you love the spices, try adding a small pinch of ground cinnamon or nutmeg to the cream cheese mixture when whisking the filling.
- Extra Texture – For a slightly different crunchy layer, substitute the Biscoff biscuits in the base with crushed ginger snaps.
How to Make No-Bake Biscoff Cheesecake Cups
These elegant cups are simple to assemble and rely solely on the refrigerator to set up beautifully.
- Make the Base: Start by crushing the Biscoff biscuits into fine crumbs. You can easily do this using a food processor or by placing them in a sealed bag and crushing them with a rolling pin. In a medium bowl, combine the Biscoff crumbs with 2 tablespoons of melted butter. Reserve a few tablespoons of the combined mixture for decoration later.
- Form the Crusts: Divide the remaining crumb mixture into your serving cups. This recipe yields approximately 8 normal-sized dessert cups or up to 16 shot-glass-sized cups, depending on your chosen glassware size. Add about 2–3 tablespoons of the mixture to the bottom of each cup, pressing down gently to form an even, compact layer. Set the cups aside.
- Make the Cheesecake Filling: In a large bowl, whisk the 2 cups of heavy cream until stiff peaks form. Set this aside. In a separate bowl, whisk the room-temperature cream cheese, powdered sugar, Biscoff spread, and vanilla extract until the mixture is smooth and creamy.
- Fold and Pipe: Gradually add the whipped heavy cream into the cream cheese mixture and gently fold everything until it is fully incorporated, ensuring the mixture remains light and airy. Add the cheesecake mixture to a large piping bag (or a large Ziploc bag with the corner snipped). Then pipe the mixture into each dessert cup over the crust.
- Garnish and Chill: Melt 1/2 cup of Lotus Biscoff spread in the microwave for 20 seconds, or until it is liquidy and easily pourable. Top the cups with a thin, even layer of the melted Biscoff spread. Add the Biscoff cookie halves to decorate and sprinkle with a little of the reserved cookie crumbs.
- Set and Serve: Refrigerate the cups for at least 4 hours until the cheesecake filling firms up completely. Serve chilled.
Pro Tip: When you melt the Biscoff spread for the topping, make sure it is liquidy enough to pour easily, but not so hot that it melts the delicate whipped cream and cream cheese mixture underneath.
Recipe Tips
- Folding Technique: Use a rubber spatula to fold the whipped cream into the cream cheese mixture using gentle, sweeping motions. This preserves the air pockets in the whipped cream, ensuring your cheesecake filling stays light and fluffy.
- Crush Finely: The finer your crumbs are for the base, the more stable your crust will be, preventing a crumbly base when you spoon out the filling later.
- Chill Time is Non-Negotiable: Do not rush the 4-hour chilling time. This is when the fat in the cream cheese and whipped cream solidifies, giving the cups their firm structure and allowing for the perfect bite.
- Piping Bag Alternative: If you don’t have a piping bag, simply scoop the filling into the cups using a spoon, then use the back of the spoon to gently smooth the top surface.
FAQs
Q: How far in advance can I make these? A: These cups are perfect for making ahead! They can be fully assembled and stored covered in the refrigerator for up to 3 days before serving.
Q: Can I use a low-fat cream cheese? A: We highly recommend using full-fat cream cheese. The fat content is essential for achieving the necessary stability and creamy texture for the no-bake filling.
Q: What size cup should I use? A: Small mason jars, lowball glasses, or even large shot glasses work great. Just remember that the total yield of the recipe (8–16 cups) depends entirely on the size of the container you choose.
Serving Suggestions
These Cheesecake Cups are elegant as-is, but a few simple additions make them feel even more special:
- A light dusting of cinnamon or powdered sugar just before serving.
- A side of fresh berries, such as raspberries or sliced strawberries, to add a tart contrast.
- A dollop of extra homemade whipped cream (lightly sweetened with vanilla).
- Serve them on a decorative platter alongside small spoons for easy handling.
Make This Recipe in Advance
These no-bake desserts are excellent candidates for advanced preparation! You can make the bases and the filling entirely up to two days ahead of time. Store the assembled, un-garnished cups in the refrigerator, tightly covered with plastic wrap. Add the melted Biscoff topping, cookie halves, and reserved crumbs no more than a few hours before serving to ensure the cookie garnish stays crisp. Freezing is not recommended as the light, airy filling can become watery upon thawing.

No-Bake Biscoff Cheesecake Cups (Individual Servings)
- Total Time: 4 hours 20 minutes
- Yield: 8 servings 1x
- Diet: Vegetarian
Description
These stunning No-Bake Biscoff Cheesecake Cups are individual, perfectly portioned desserts that showcase the spiced caramel flavor of Biscoff cookies and spread. They feature a crunchy, buttery cookie base, a light and airy cheesecake filling infused with Biscoff spread, and are topped with a warm, gooey Biscoff drizzle. Requiring no oven time, this easy, elegant treat is ready in 20 minutes of active work and is ideal for making ahead.
Ingredients
Crumb Base
- 30 Lotus biscoff biscuits
- 2 tablespoons unsalted butter, melted
Cheesecake Filling
- 16 oz heavy cream, 2 cups, cold
- 8 oz cream cheese, at room temp
- 1/2 cup powdered sugar
- 1/2 cup biscoff spread
- 1 teaspoon vanilla extract
Garnish
- 1/2 cup biscoff spread
- 8 biscoff cookies, cut in half
Instructions
Step 1: Make the Base
Start by crushing the Biscoff biscuits into fine crumbs using a food processor or a sealed bag and a rolling pin. In a medium bowl, combine the Biscoff crumbs with 2 tablespoons of melted butter. Reserve a few tablespoons of the combined mixture for decoration later.
Step 2: Form the Crusts
Divide the remaining crumb mixture into your 8 serving cups (or 16 smaller cups). Add about 2–3 tablespoons of the mixture to the bottom of each cup, pressing down gently to form an even, compact layer. Set the cups aside.
Step 3: Make the Cheesecake Filling
In a large bowl, whisk the 2 cups of cold heavy cream until stiff peaks form. Set this aside. In a separate bowl, whisk the room-temperature cream cheese, powdered sugar, Biscoff spread, and vanilla extract until the mixture is completely smooth and creamy.
Step 4: Fold and Pipe
Gradually add the whipped heavy cream into the cream cheese mixture and gently fold everything until it is fully incorporated, ensuring the mixture remains light and airy. Pipe or spoon the cheesecake mixture into each dessert cup over the crust.
Step 5: Garnish and Chill
Melt 1/2 cup of Biscoff spread in the microwave for about 20 seconds, until it is liquidy and easily pourable. Top the cups with a thin, even layer of the melted Biscoff spread. Decorate with the Biscoff cookie halves and sprinkle with a little of the reserved cookie crumbs.
Step 6: Set and Serve
Refrigerate the cups for at least 4 hours until the cheesecake filling firms up completely. Serve chilled.
Notes
Make-Ahead Tip: These cheesecake cups can be fully assembled up to two days in advance. Store them covered in the refrigerator. For the crispiest garnish, add the melted Biscoff topping, cookie halves, and reserved crumbs no more than a few hours before serving.
Ensuring Fluffy Texture: When combining the whipped cream with the cream cheese mixture, use a gentle folding motion with a rubber spatula. This prevents deflating the air pockets in the whipped cream, which is crucial for maintaining the light, mousse-like structure of the filling.
Recommended Cheese: Use full-fat cream cheese for this recipe. The high fat content is essential for achieving the necessary stability and perfect, creamy texture for this no-bake filling.
- Prep Time: 20 minutes
- Cook Time: 0 minutes
- Category: Dessert
- Method: No-Bake
- Cuisine: European
Nutrition
- Serving Size: 1 cup
- Calories: 685
- Sugar: 39g
- Sodium: 215mg
- Fat: 58g
- Saturated Fat: 35g
- Unsaturated Fat: 20g
- Trans Fat: 1g
- Carbohydrates: 40g
- Fiber: 1g
- Protein: 7g
- Cholesterol: 145mg
Keywords: no-bake cheesecake cups, biscoff dessert, lotus speculoos, easy no bake, individual dessert cups, creamy cheesecake