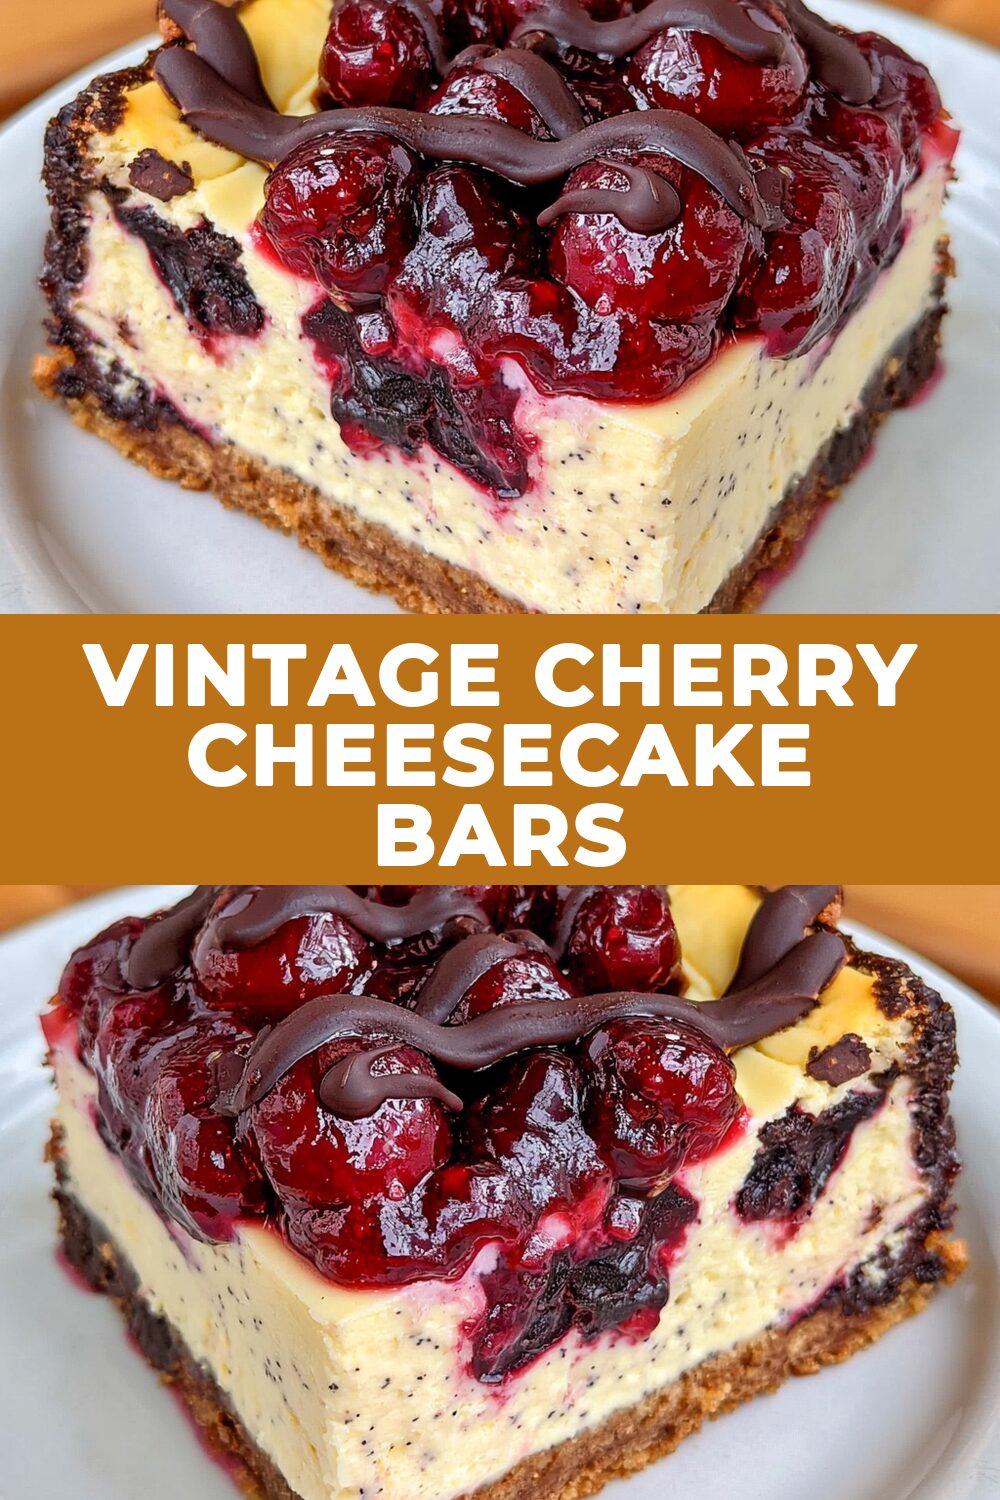
Step into a world of nostalgic comfort with these Vintage Cherry Cheesecake Bars. Imagine a buttery, crisp graham cracker crust cradling a lusciously smooth, tangy cheesecake filling, all crowned with a sweet, jewel-toned cherry topping. These bars are a delightful blend of textures and classic flavors that are sure to evoke happy memories and create new ones.
These cherry cheesecake bars are a perfect symphony of sweet and tart, with a creamy cheesecake nestled on a buttery graham cracker base, finished with a bright cherry topping.
Recipe Details
- Flavor Profile: Sweet, tangy, creamy, buttery
- Texture Profile: Crisp crust, smooth filling, soft topping
- Total Active Time: Approximately 20 minutes
- Total Chill Time: At least 2 hours
- Difficulty Level: Easy
What You’ll Need
To bring these delightful Vintage Cherry Cheesecake Bars to life, you’ll need a few key components: a perfectly crumbly graham cracker crust, a rich and creamy cheesecake filling, and a vibrant cherry topping. This recipe is designed to be straightforward and rewarding for bakers of all levels.
Ingredient Notes
- Graham Cracker Crumbs – These form the foundation of our bars, providing a delightful crispness and buttery flavor. You can easily make your own by pulsing graham crackers in a food processor or crushing them in a sealed bag with a rolling pin.
- Cream Cheese – Make sure your cream cheese is fully softened to room temperature. This is crucial for achieving a super smooth and lump-free cheesecake filling. Cold cream cheese can lead to a grainy texture.
- Eggs – These bind the filling together, giving the cheesecake its structure. Be careful not to overmix them into the cream cheese mixture, as this can introduce too much air and cause cracks.
- Cherry Pie Filling – This convenient topping brings a burst of sweet cherry flavor and a beautiful color. It’s the perfect finishing touch that makes these bars truly special.
Add-ins and Substitutions
While these Vintage Cherry Cheesecake Bars are wonderfully classic as is, you can always personalize them! For a touch of added texture in the crust, consider mixing in a tablespoon of finely chopped nuts like pecans or walnuts with the graham cracker crumbs. If you’re not a fan of cherry, you could experiment with other pre-made fruit pie fillings, such as blueberry or strawberry, though the classic cherry is truly irresistible. For an extra layer of flavor, a tiny pinch of cinnamon in the crust can add a warm, spiced note.
How to Make Vintage Cherry Cheesecake Bars
Creating these delightful bars is a straightforward process, involving a simple crust, a smooth filling, and a beautiful topping. Follow these steps for perfect results every time.
- Prepare Your Station and Crust: Begin by preheating your oven to 350°F (175°C). Line an 8×8 inch baking dish with parchment paper or foil, ensuring there’s a slight overhang on the sides to help lift the bars out later. Lightly grease the liner. In a medium bowl, combine the graham cracker crumbs, 1/4 cup granulated sugar, and 6 tablespoons of melted unsalted butter. Stir until the crumbs are evenly moistened. Press this mixture firmly and evenly into the bottom of your prepared baking dish. Bake the crust for 8 minutes, then remove it from the oven to cool slightly.
- Whip Up the Cheesecake Filling: In a separate large bowl, beat the 16 ounces of softened cream cheese with 1/2 cup granulated sugar until the mixture is wonderfully smooth and free of any lumps. You can use an electric mixer on medium speed or a sturdy whisk and some elbow grease.
- Gently Incorporate Wet Ingredients: Add the 2 large eggs, 1 teaspoon of vanilla extract, and 1 tablespoon of lemon juice to the cream cheese mixture. Mix on a low speed until everything is just blended. It’s important not to overmix at this stage, as you want to avoid incorporating too much air.
- Assemble and Bake: Pour the cream cheese filling evenly over the pre-baked graham cracker crust. Spread it gently to ensure an even layer.
- Bake to Perfection: Place the dish back into the preheated oven and bake for 25 to 30 minutes, or until the edges are set and the center is just slightly jiggly. It will continue to set as it cools.
- Cool and Chill: Remove the cheesecake bars from the oven and let them cool completely at room temperature on a wire rack. Once cooled, cover the dish and refrigerate for at least two hours, or until thoroughly chilled. This chilling time is essential for the cheesecake to set properly and for easier cutting.
- Add the Topping: Before serving, carefully spoon the entire can of 21 oz cherry pie filling evenly over the chilled cheesecake layer.
-
Slice and Enjoy: Using the parchment paper overhang, lift the cheesecake out of the dish. Cut into squares and serve.
-
Pro Tip: For perfectly clean cuts, use a sharp knife that has been dipped in hot water and wiped dry between each slice. This will help prevent the topping from smearing and the cheesecake from crumbling.
Recipe Tips
- Achieving a Smooth Filling: Ensure your cream cheese is truly softened. If it’s too cold, it will be difficult to mix smoothly, leading to lumps. A quick way to soften cream cheese is to unwrap it and let it sit on the counter for about an hour, or cut it into smaller cubes to speed up the process.
- Don’t Overmix the Eggs: Overbeating the eggs can incorporate too much air into the filling, which can cause the cheesecake to puff up excessively and then crack as it cools. Mix on low speed until just combined.
- Cooling is Key: Patience is a virtue when it comes to cheesecake. Allowing the bars to cool completely at room temperature before refrigerating is crucial for the texture. Rushing this step can result in a softer, less set cheesecake.
- Perfectly Set Center: The baking time is a guide; ovens can vary. Look for the edges to be set and the center to have a slight wobble, like Jell-O. It should not be liquidy. It will firm up considerably as it chills.
- Lifting Out Your Bars: The parchment paper or foil liner is your best friend here. Make sure it extends up the sides of the pan. Once chilled, use the overhang to gently lift the entire block of cheesecake out of the pan before slicing.
FAQs
- How do I prevent my cheesecake from cracking? While cracking is more common in full cheesecakes baked in a water bath, for these bars, the main culprits are overmixing the eggs and not allowing the cheesecake to cool gradually. Ensure you mix the eggs on low speed and let the bars cool completely at room temperature before chilling.
- Can I use fresh cherries instead of pie filling? You certainly could, but it would involve making a cherry compote or sauce from scratch, which adds a significant extra step and alters the intended simplicity of this recipe. The canned pie filling provides a convenient, concentrated cherry flavor and texture that works beautifully here.
- How long do these bars need to chill? For the best texture and ease of cutting, chilling for at least two hours is recommended. Overnight chilling will result in an even firmer and more sliceable cheesecake.
- How should I store leftover cheesecake bars? Store any leftover Vintage Cherry Cheesecake Bars in an airtight container in the refrigerator for up to 3 to 4 days.
Serving Suggestions
These Vintage Cherry Cheesecake Bars are delightful on their own, but they also pair wonderfully with a variety of accompaniments. A dollop of fresh whipped cream on top adds an extra layer of indulgence. For a refreshing contrast, serve them alongside a simple fresh fruit salad, perhaps with some berries or melon. They also make a lovely sweet finish to a potluck or barbecue meal.
Make This Recipe in Advance
The beauty of these Vintage Cherry Cheesecake Bars is that they are perfect for making ahead! You can bake the crust and prepare the filling, then bake and chill the cheesecake base up to a day in advance. Store the cheesecake base, uncovered, in the refrigerator. Add the cherry topping just before you are ready to serve, as the topping can make the cheesecake slightly softer if left on for too long. While freezing cheesecake is possible, these bars are best enjoyed fresh within a few days of preparation due to the texture of the graham cracker crust.
Print
Vintage Cherry Cheesecake Bars
- Total Time: 2 hours 33 minutes
- Yield: 16 servings
Description
Step into a world of nostalgic comfort with these Vintage Cherry Cheesecake Bars. Imagine a buttery, crisp graham cracker crust cradling a lusciously smooth, tangy cheesecake filling, all crowned with a sweet, jewel-toned cherry topping. These bars are a delightful blend of textures and classic flavors that are sure to evoke happy memories and create new ones.
Ingredients
Crust: 1.5 cups graham cracker crumbs, 1/4 cup granulated sugar, 6 tbsp unsalted butter (melted)
Filling: 16 oz cream cheese (softened), 1/2 cup granulated sugar, 2 large eggs, 1 tsp vanilla extract, 1 tbsp lemon juice
Topping: 1 can (21 oz) cherry pie filling
Instructions
Warm your oven to 350F (175C) and prepare an 8×8 inch baking dish by lining it with foil or parchment paper and lightly greasing it.
Combine graham cracker crumbs, sugar, and melted butter. Press this mixture firmly into the base of your prepared dish and bake for 8 minutes.
In a separate bowl, cream together the softened cream cheese and sugar until smooth and free of lumps.
Gently incorporate the eggs, vanilla extract, and lemon juice on a low speed until just blended.
Pour the cream cheese mixture evenly over the baked crust.
Bake for 25 to 30 minutes, until the center is set. Allow it to cool completely at room temperature, then chill in the refrigerator for a couple of hours.
Spoon the cherry pie filling evenly over the top before cutting into squares.
Notes
Ensure your cream cheese is fully softened to room temperature. This is crucial for achieving a super smooth and lump-free cheesecake filling. Cold cream cheese can lead to a grainy texture.
These bind the filling together, giving the cheesecake its structure. Be careful not to overmix them into the cream cheese mixture, as this can introduce too much air and cause cracks.
This convenient topping brings a burst of sweet cherry flavor and a beautiful color. It’s the perfect finishing touch that makes these bars truly special.
Ensure your cream cheese is truly softened. If it’s too cold, it will be difficult to mix smoothly, leading to lumps. A quick way to soften cream cheese is to unwrap it and let it sit on the counter for about an hour, or cut it into smaller cubes to speed up the process.
Overbeating the eggs can incorporate too much air into the filling, which can cause the cheesecake to puff up excessively and then crack as it cools. Mix on low speed until just combined.
Patience is a virtue when it comes to cheesecake. Allowing the bars to cool completely at room temperature before refrigerating is crucial for the texture. Rushing this step can result in a softer, less set cheesecake.
The baking time is a guide; ovens can vary. Look for the edges to be set and the center to have a slight wobble, like Jell-O. It should not be liquidy. It will firm up considerably as it chills.
The parchment paper or foil liner is your best friend here. Make sure it extends up the sides of the pan. Once chilled, use the overhang to gently lift the entire block of cheesecake out of the pan before slicing.
- Prep Time: 20 minutes
- Cook Time: 33-38 minutes
- Category: Dessert
- Cuisine: American
Nutrition
- Calories: N/A
- Fat: N/A
- Carbohydrates: N/A
- Protein: N/A