Sweet Homemade Caramels
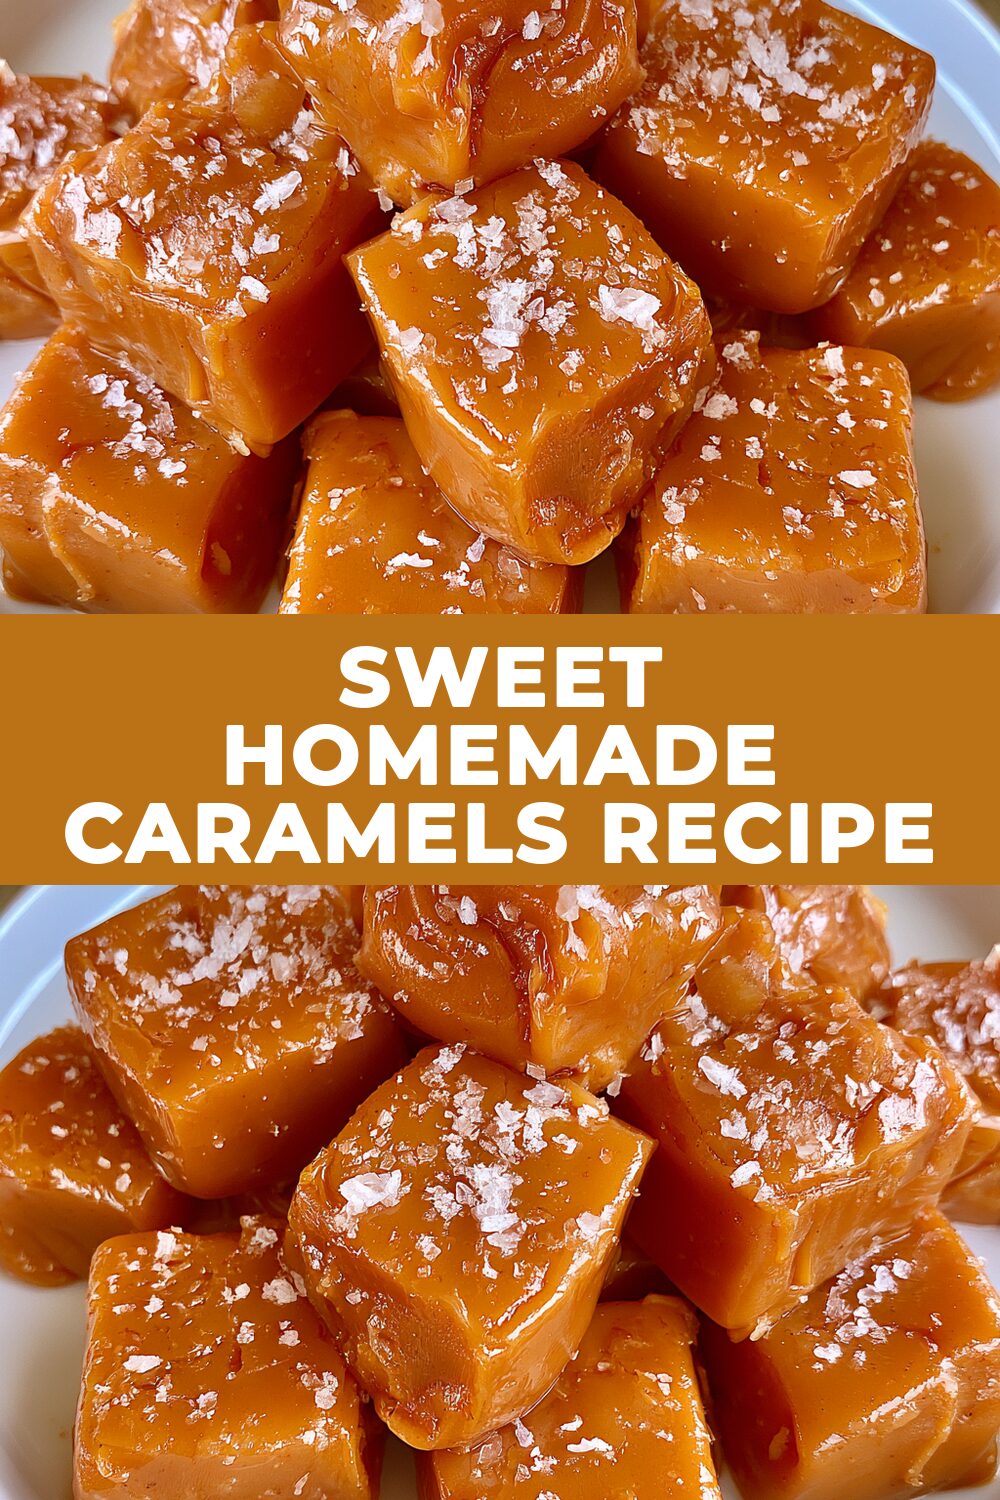
There’s something truly magical about homemade caramel. It’s a treasure trove of rich, buttery sweetness, with a satisfyingly chewy texture that melts in your mouth. These sweet homemade caramels are simple enough for a beginner but impressive enough for any holiday gathering or a simple afternoon treat.
Imagine squares of pure, golden happiness, dusted with just a hint of sea salt to perfectly balance that deep, comforting sweetness.
Recipe Details
- Flavor Profile: Rich, buttery, sweet, with a hint of salt.
- Texture: Chewy and smooth.
- Total Active Time: Approximately 30 minutes (plus 3-4 hours cooling time).
- Difficulty: Easy.
What You’ll Need
To create these delightful sweet homemade caramels, you’ll primarily need pantry staples. The magic happens in a sturdy saucepan where butter, sugars, corn syrup, and sweetened condensed milk come together, all brought to the perfect temperature with the help of a candy thermometer. You’ll also need an 8×8 inch pan and parchment paper for setting.
Ingredient Notes
- Unsalted Butter – Using unsalted butter allows you to control the saltiness of your caramels. Make sure it’s good quality for the best flavor.
- Granulated Sugar & Dark Brown Sugar – These two sugars work together to provide sweetness and that classic caramel color and depth.
- Light Corn Syrup – This is key for achieving a smooth, chewy texture and preventing crystallization.
- Sweetened Condensed Milk – This provides the creamy base for our caramels.
- Pure Vanilla Extract – A touch of vanilla elevates the flavor, adding warmth and complexity.
- Flaky Sea Salt – This is for sprinkling on top, adding a beautiful visual appeal and a delightful salty contrast to the sweet caramel.
Add-ins and Substitutions
While these sweet homemade caramels are divine as they are, you can certainly have some fun with them. For a touch of indulgence, consider stirring in a handful of mini chocolate chips right after removing the caramel from the heat, just before pouring it into the pan. Chopped nuts like pecans or walnuts are also a wonderful addition, sprinkled on top of the sea salt before the caramel cools.
How to Make Sweet Homemade Caramels Recipe
The process for making these luscious sweet homemade caramels is straightforward and incredibly rewarding. It involves a bit of stirring and a keen eye on your candy thermometer, but the result is absolutely worth it.
First, prepare your 8×8 inch pan by lining it with parchment paper. This makes it so much easier to lift the finished caramel out later. Next, in a sturdy saucepan, combine the unsalted butter, granulated sugar, packed dark brown sugar, light corn syrup, and sweetened condensed milk. Place this over medium heat and begin to stir everything together.
Bring the mixture to a gentle boil, continuing to stir constantly with a heatproof spatula to ensure nothing sticks or scorches. Once it’s bubbling, attach your candy thermometer to the side of the saucepan, making sure the tip is submerged in the mixture but not touching the bottom. Now, the patient part begins: continue cooking and stirring constantly for about 20 to 25 minutes. You’re looking for the mixture to reach precisely 244 degrees Fahrenheit (118 degrees Celsius), which is known as the firm ball stage. This temperature is crucial for achieving that perfect chewy consistency.
As soon as your caramel reaches the magical 244F mark, immediately remove the saucepan from the heat. Stir in the pure vanilla extract until it’s fully incorporated. Pour this glorious, molten caramel into your prepared pan. Quickly and evenly sprinkle the top with the flaky sea salt.
Now, the hardest part: letting it cool. Allow the caramel to cool completely at room temperature for at least 3 to 4 hours. Resist the urge to poke or prod it! Once it’s fully set, use the parchment paper to gently lift the entire slab of caramel out of the pan. With a sharp knife that you’ve lightly buttered (this prevents sticking), cut the caramel into your desired square sizes. Finally, wrap each individual piece in wax paper to keep them fresh and prevent sticking.
Pro Tip: Stirring constantly is your best friend here. It prevents the sugars from crystallizing and ensures even cooking, leading to the smoothest, chewiest caramel.
Recipe Tips
- Use a Sturdy Pan: A heavy-bottomed saucepan distributes heat more evenly, reducing the risk of scorching.
- Candy Thermometer is Key: Don’t guess the temperature! A candy thermometer is essential for achieving the correct texture. Make sure it’s calibrated correctly.
- Constant Stirring: As mentioned, this is vital for smooth, consistent caramel. Stirring also helps the thermometer to accurately read the temperature of the whole mixture.
- Cooling is Crucial: Patience during the cooling phase ensures the caramel sets up properly. Cutting too soon will result in messy, gooey squares.
- Buttered Knife for Cutting: A lightly buttered knife slides through the firm caramel much more easily, giving you cleaner cuts and preventing sticking.
FAQs
- Why is my caramel hard/too soft? This is almost always due to temperature. If it’s too hard, it likely cooked beyond 244F. If it’s too soft and gooey, it didn’t reach temperature. Small variations in temperature can make a big difference.
- Can I make caramel without corn syrup? While it’s possible, corn syrup helps prevent sugar crystallization and ensures a smoother texture. Without it, you might end up with a grainier caramel.
- How do I store homemade caramels? Once cut and individually wrapped, store them in an airtight container at room temperature for up to 2 weeks. Avoid refrigerating, as this can make them too hard.
Serving Suggestions
These sweet homemade caramels are perfect on their own, of course, but they also make wonderful edible gifts. They can be beautifully arranged on a dessert platter alongside other sweet treats, or even chopped and sprinkled over ice cream. For a truly decadent experience, serve them with a warm mug of coffee or a rich hot chocolate.
Make This Recipe in Advance
You can absolutely make these sweet homemade caramels ahead of time. Once cooled and cut, wrap each piece individually in wax paper and store them in an airtight container at room temperature for up to 2 weeks. This makes them a fantastic option for holiday preparations or party planning, as you can check them off your list well in advance.
Print
Sweet Homemade Caramels Recipe
- Total Time: 3-4 hours (cooling)
- Yield: Approximately 36-49 squares
Description
Learn how to make delicious sweet homemade caramels from scratch. This easy recipe yields chewy, buttery caramels with a hint of sea salt, perfect for any occasion.
Ingredients
• 1 cup (2 sticks) unsalted butter
• 1 cup granulated sugar
• 1 cup dark brown sugar, packed
• 1 cup light corn syrup
• 1 can (14 oz) sweetened condensed milk
• 1 tsp pure vanilla extract
• 1/2 tsp flaky sea salt
Instructions
Prepare an 8×8 inch pan by lining it with parchment paper and lightly greasing it.
In a sturdy saucepan, blend together the butter, granulated sugar, packed dark brown sugar, light corn syrup, and sweetened condensed milk over medium heat.
Bring this mixture to a boil while stirring continuously with a heatproof spatula.
Attach a candy thermometer and continue cooking, stirring constantly, for 20 to 25 minutes, or until the mixture reaches precisely 244F (118C), which is the firm ball stage.
Once it reaches temperature, immediately remove the saucepan from the heat and stir in the vanilla extract.
Pour the caramel into the prepared pan and sprinkle the top with flaky sea salt.
Allow it to cool completely at room temperature for 3 to 4 hours.
Finally, lift the caramel out of the pan using the parchment paper and cut it into squares with a sharp, buttered knife, then wrap each piece individually in wax paper.
Notes
Use a Sturdy Pan: A heavy-bottomed saucepan distributes heat more evenly, reducing the risk of scorching.
Candy Thermometer is Key: Don’t guess the temperature! A candy thermometer is essential for achieving the correct texture. Make sure it’s calibrated correctly.
Constant Stirring: As mentioned, this is vital for smooth, consistent caramel. Stirring also helps the thermometer to accurately read the temperature of the whole mixture.
Cooling is Crucial: Patience during the cooling phase ensures the caramel sets up properly. Cutting too soon will result in messy, gooey squares.
Buttered Knife for Cutting: A lightly buttered knife slides through the firm caramel much more easily, giving you cleaner cuts and preventing sticking.
- Prep Time: 30 minutes
- Cook Time: 25 minutes
- Category: Dessert
- Cuisine: American
Nutrition
- Calories: N/A
- Fat: N/A
- Carbohydrates: N/A
- Protein: N/A