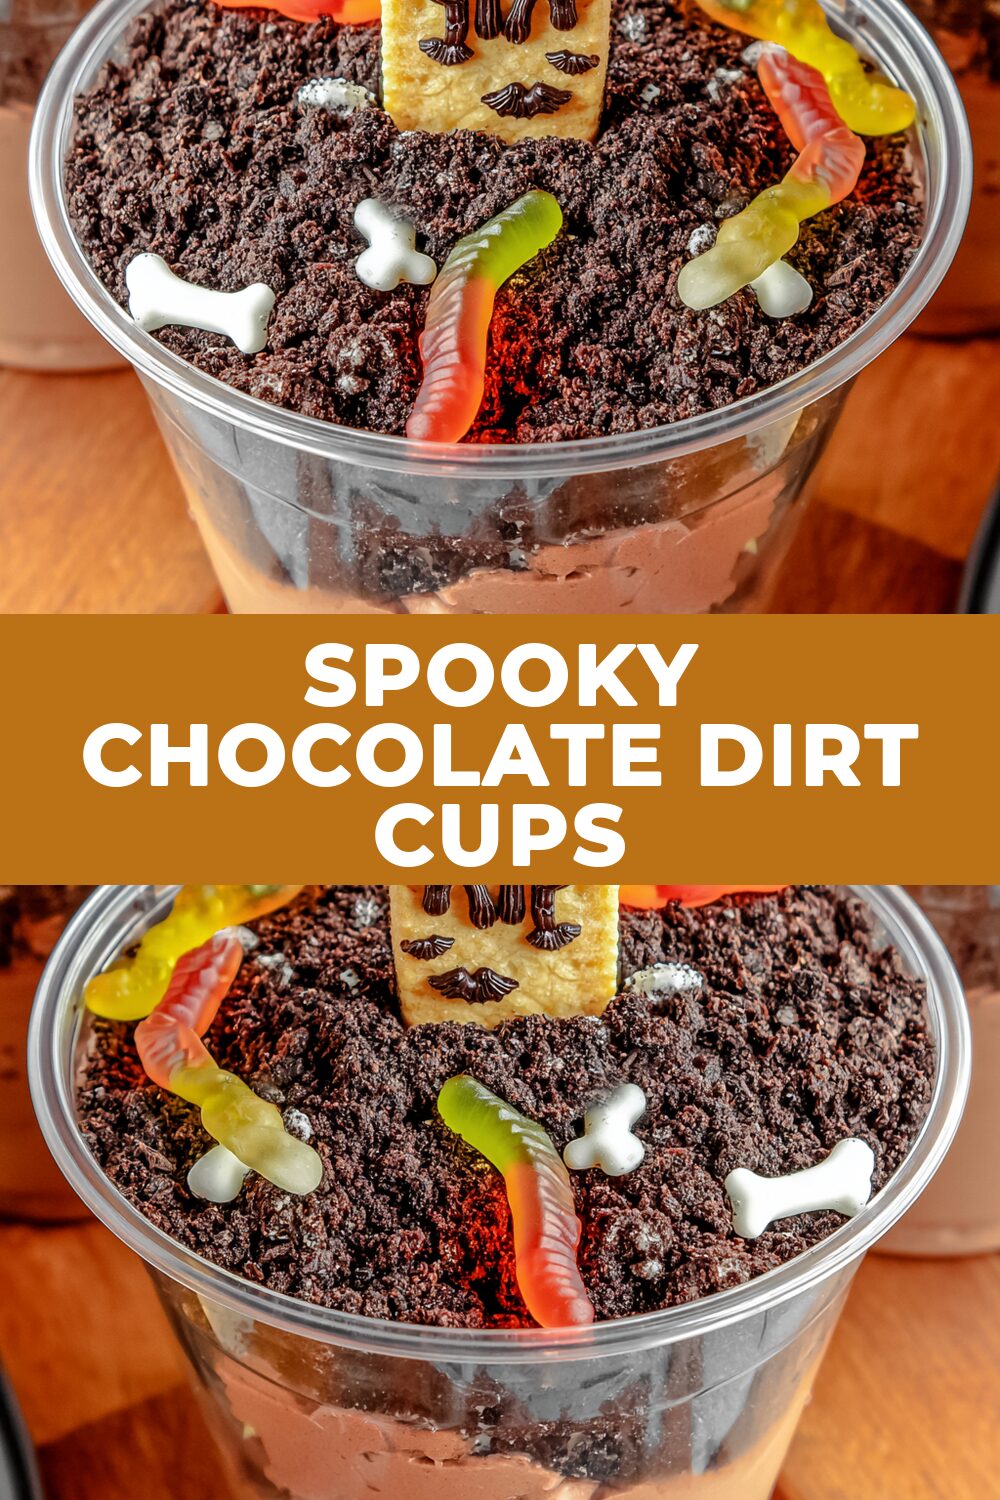
Get ready for a wickedly delightful treat that’s as fun to make as it is to eat! These Spooky Chocolate Dirt Cups are a playful, no bake dessert perfect for Halloween parties, classroom treats, or just a fun afternoon with the kids. With rich chocolate pudding, crumbly “dirt” from crushed Oreos, and adorable tombstone cookies, they’re guaranteed to be a hit with ghosts and ghouls of all ages.
These charming cups capture the essence of a spooky graveyard with layers of chocolatey goodness and creepy crawly surprises.
Recipe Details
- Flavor Profile: Deeply chocolatey with a sweet, creamy pudding and the satisfying crunch of cookie crumbs.
- Textures: Smooth pudding, crisp cookie layers, and a delightfully crumbly topping.
- Total Active Time: 20 minutes
- Chill Time: 5 minutes
- Difficulty Level: Easy – perfect for little helpers in the kitchen!
What You’ll Need
To bring these Spooky Chocolate Dirt Cups to life, you’ll need a few key players: rich chocolate pudding mix, creamy whole milk, plenty of crushed Oreo cookies for our “dirt,” light and airy whipped topping, some fun Milano cookies for tombstones, black decorating icing to add those spooky epitaphs, and of course, some wiggly gummy worms to make the scene complete.
Ingredient Notes
- Instant Chocolate Pudding Mix – This is our quick and easy base for that classic chocolate flavor. Using instant ensures a smooth, set pudding without any fuss.
- Whole Milk – Whole milk provides the richest flavor and creamiest texture for our pudding.
- Oreo Cookies – These are essential for creating that authentic “dirt” look and adding a delightful crunch. Crush them finely for the best effect.
- Whipped Topping – This adds a lovely lightness and fluffiness to the pudding, making it extra smooth and delicious.
- Milano Cookies – Their elegant, rectangular shape makes them perfect candidates for spooky tombstone decorations.
- Black Decorating Icing – This is for adding those essential “RIP” messages to our cookies, turning them into miniature graveyard markers.
- Gummy Worms – The final, playful touch that brings our graveyard scene to life!
Add-ins and Substitutions
While these Spooky Chocolate Dirt Cups are wonderful as is, you can certainly get creative! For a darker, richer chocolate flavor, consider using a dark chocolate pudding mix. If you’d like to add a little extra texture, some chocolate cookie crumbs can be mixed into the pudding layers. For a more adult twist, a tiny splash of coffee liqueur could be stirred into the pudding mixture before chilling, but be sure to skip this if children will be enjoying these treats.
How to Make Spooky Chocolate Dirt Cups
Let’s get this graveyard party started! Making these dirt cups is a simple, three step process that’s perfect for little hands to help with.
- Whip up the Pudding: In a medium bowl, whisk together the instant chocolate pudding mix and cold whole milk for two minutes, just until it starts to thicken. Let this pudding mixture stand for about five minutes to fully set.
- Fold in the Fluffiness: Gently fold the thawed whipped topping into the set chocolate pudding. Mix until everything is beautifully smooth and well combined, creating a lighter, creamier chocolate filling.
- Decorate Your Tombstones: Grab your Milano cookies and the black decorating icing. Pipe or carefully write “RIP” onto each cookie. Let these spooky tombstones dry for a moment.
- Build Your Graveyard Cups: Now for the fun layering! Start by spooning a layer of your crushed Oreo “dirt” into the bottom of your clear serving cups.
- Alternate the Layers: Continue by alternating layers of the luscious chocolate pudding mixture with more crushed Oreo crumbs. Make sure your final layer is a generous topping of that dark, crumbly “dirt.”
-
Add the Finishing Touches: Gently stand one of your “RIP” Milano tombstone cookies upright in the top of each cup. Nestle a few gummy worms around the “dirt” surface, letting them peek out as if they’re crawling out of the ground.
-
Pro Tip: For the best “dirt” effect, use a food processor to crush your Oreos. You want a fine crumb, not large chunks, to truly mimic soil.
Recipe Tips
- Crushing Cookies: For the most authentic dirt texture, ensure your Oreo crumbs are very fine. You can do this by pulsing them in a food processor or by placing them in a sturdy zip-top bag and crushing them with a rolling pin.
- Gentle Folding: When incorporating the whipped topping into the pudding, fold gently. This helps to keep the mixture light and airy, preventing a dense dessert.
- Layering Technique: Don’t overfill your cups! Leaving a little space at the top makes it easier to add the tombstone and worms without making a mess.
- Serving Cups: Clear plastic cups work wonderfully for these dirt cups, allowing everyone to see the fun layers and spooky decorations. Small mason jars or even ramekins would also be charming.
FAQs
- Can I make the pudding from scratch? While you can certainly make chocolate pudding from scratch, the recipe specifically calls for instant pudding mix to ensure quick setting and ease of assembly. Using scratch-made pudding might require different setting times and techniques.
- What kind of milk is best? Whole milk yields the creamiest, richest pudding. However, you can use 2% milk if that’s what you have on hand; it will just be slightly less rich.
- How long do these dirt cups need to set? The pudding itself only needs about 5 minutes to set after whisking. The cups are best served shortly after assembly, but can be chilled for a short period before serving.
Serving Suggestions
These Spooky Chocolate Dirt Cups are a standalone star, but they also pair wonderfully with a glass of cold milk, a refreshing sparkling cider, or even a scoop of vanilla ice cream for an extra decadent treat. They are the perfect addition to any Halloween party spread, alongside other festive finger foods and spooky snacks.
Make This Recipe in Advance
You can prepare components of these Spooky Chocolate Dirt Cups in advance to save time on the day of your event. The Oreo crumbs can be crushed and stored in an airtight container at room temperature for up to 2 days. The chocolate pudding can be made and the whipped topping folded in a day ahead, then stored in an airtight container in the refrigerator. However, for the freshest look and to prevent the Milano cookies from softening, it’s best to add the tombstones and gummy worms just before serving.

Spooky Chocolate Dirt Cups
- Total Time: 20 minutes
- Yield: 6-8 servings 1x
Description
Get ready for a delightfully eerie treat that’s as fun to make as it is to eat! These Spooky Chocolate Dirt Cups are a playful, no-bake dessert perfect
Ingredients
1 package (3.9 oz) instant chocolate pudding mix
2 cups cold whole milk
1 pkg (14.3 oz) Oreo cookies, crushed into fine dirt crumbs
8 oz whipped topping (Cool Whip), thawed
12 rectangular Milano cookies (for tombstones)
1 tube black decorating icing
12 gummy worms
Instructions
Whisk the instant chocolate pudding mix with cold whole milk for two minutes in a bowl, then allow it to set for five minutes.
Gently fold the thawed whipped topping into the chocolate pudding until it is smooth and even.
Use the black decorating icing to pipe or write ‘RIP’ onto each Milano cookie, creating little tombstones.
Begin by layering the crushed Oreo dirt crumbs at the bottom of six to eight clear plastic serving cups.
Alternate layers of the chocolate pudding and crushed Oreo crumbs, making sure to finish with a generous layer of Oreo dirt on top.
Stand one Milano tombstone cookie upright in the top of each cup and nestle gummy worms around the dirt surface before serving.
- Prep Time: 15 minutes
- Cook Time: 0 minutes
- Category: Desserts
- Cuisine: American
Nutrition
- Calories: N/A
- Fat: N/A
- Carbohydrates: N/A
- Protein: N/A