Get ready for a dessert that dreams are made of! This no-bake Oreo chocolate mousse pie is an absolute showstopper, combining a crisp, chocolatey cookie crust with a luxuriously smooth and rich chocolate mousse filling that’s simply irresistible. It’s the perfect treat for any occasion, from casual get-togethers to more special celebrations, promising pure indulgence with every delightful bite.
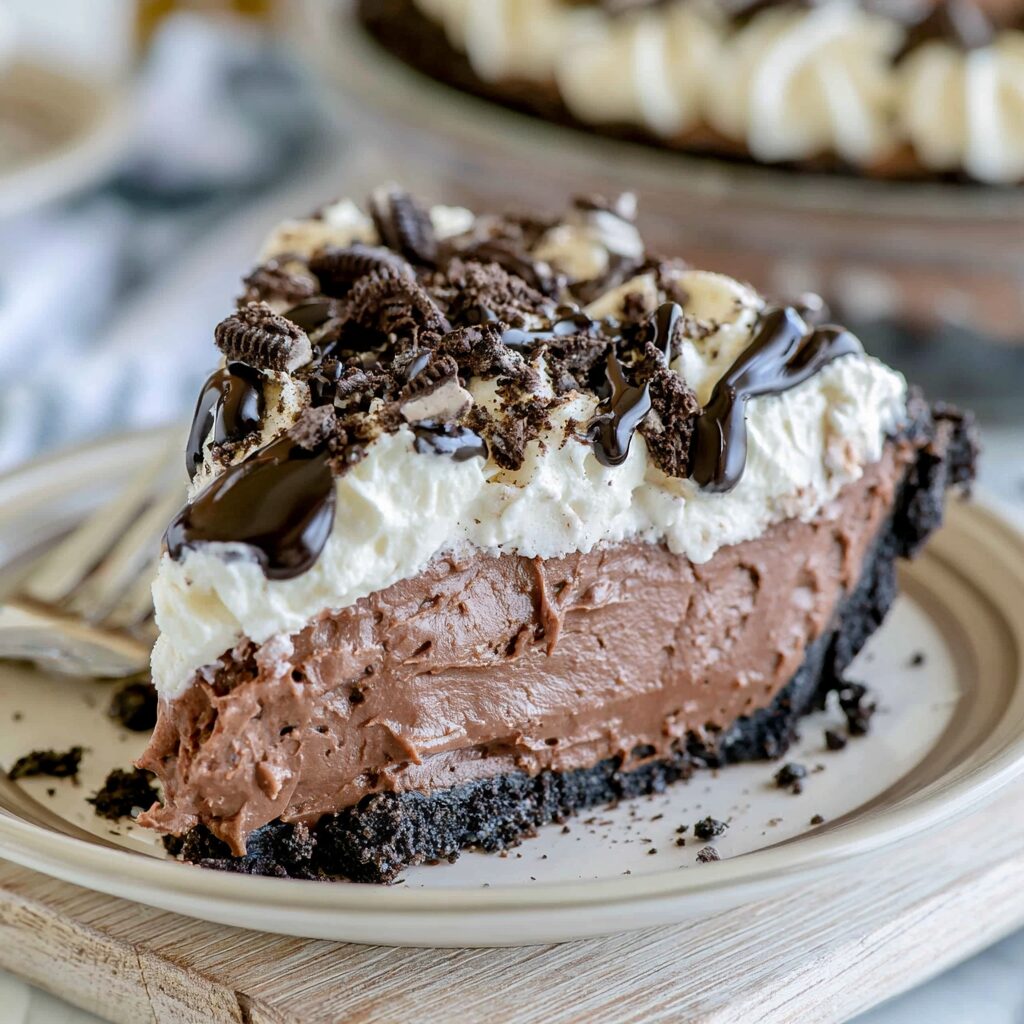
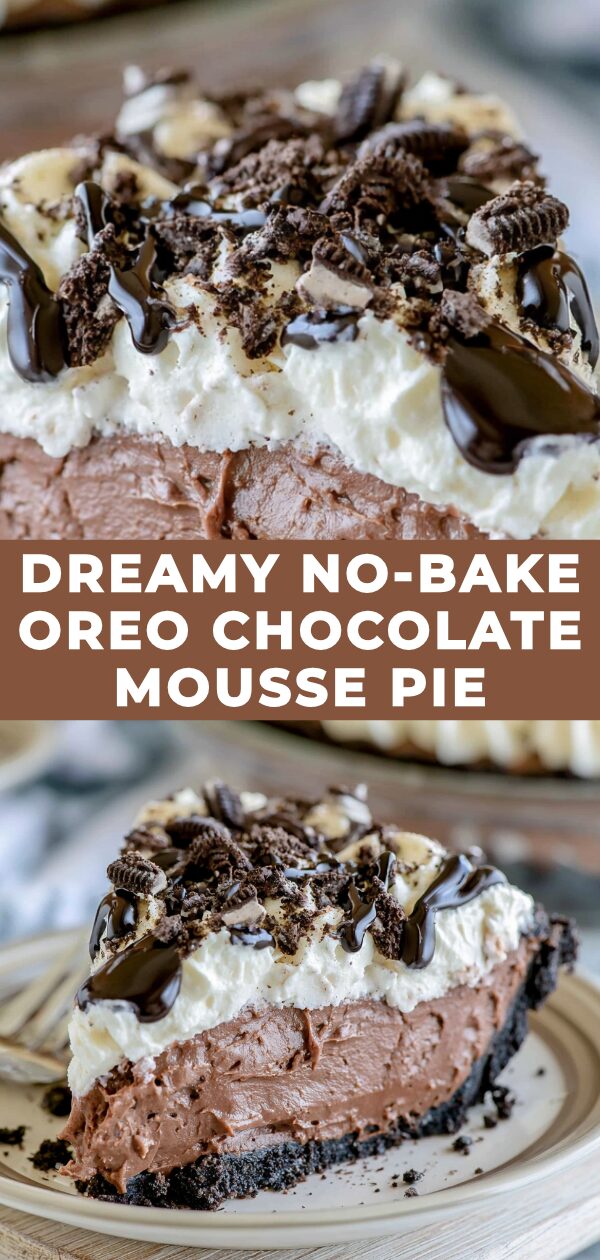
Imagine a slice of this decadent pie, its glossy chocolate topping revealing the ethereal mousse beneath, all nestled in a crumbly Oreo crust – pure bliss awaits.
Recipe Details
- Flavor Profile: Rich, intense chocolate with a delightful Oreo cookie hint.
- Texture: A symphony of creamy, velvety mousse against a crunchy, satisfying crust.
- Total Active Time: Approximately 30 minutes, plus chilling time.
- Difficulty Level: Easy. Perfect for beginners and seasoned bakers alike.
What You’ll Need
This dreamy Oreo pie brings together classic flavors in a simple, no-bake format. The foundation is a crushed Oreo cookie crust, which provides a wonderful crunch. This is topped with an impossibly smooth and airy chocolate mousse, creating a delightful contrast in textures. Finally, a rich chocolate topping or ganache adds the perfect finishing touch, making this chocolate mousse pie an absolute showstopper.
Ingredient Notes
- Oreos – You’ll need a generous amount of your favorite Oreos for both the crust and as a lovely garnish if you choose. Be sure to crush them finely for the best crust consistency.
- Butter – Unsalted butter is key here, melted to bind the cookie crumbs together and create that perfectly firm crust.
- Cream Cheese – Softened cream cheese acts as the binder and adds a subtle tang that balances the sweetness of the chocolate.
- Confectioners’ Sugar – This fine sugar dissolves beautifully into the mousse, ensuring a silky smooth texture without any grittiness.
- Cocoa Powder – For that deep, intense chocolate flavor, use a good quality unsweetened cocoa powder. Natural or Dutch-processed will work well.
- Heavy Cream – Whipped heavy cream adds airiness and that signature light, cloud-like texture to the chocolate mousse.
- Vanilla Extract – A touch of vanilla enhances the chocolate flavor, adding depth and warmth to the overall taste.
- Chocolate – Semi-sweet chocolate chips or a chopped semi-sweet chocolate bar are perfect for melting into the mousse and for creating the topping.
Add-ins and Substitutions
- Chocolate Chips in Mousse – Feel free to fold in some mini semi-sweet chocolate chips into the mousse mixture for little bursts of chocolate in every bite.
- Dark Chocolate Mousse – For a more intense chocolate experience, you can substitute some of the semi-sweet chocolate with dark chocolate. Just adjust the sweetness of the confectioners’ sugar accordingly if needed.
- White Chocolate Swirl – Melt some white chocolate and drizzle it over the top of the finished pie, or swirl it into the chocolate mousse before chilling for a beautiful marbled effect.
- Different Cookies – While Oreos are classic, you could experiment with other chocolate sandwich cookies for a slightly different flavor profile in the crust.
How to Make Dreamy No-Bake Oreo Chocolate Mousse Pie
Creating this spectacular pie is wonderfully straightforward, making it an ideal dessert for any occasion. It all starts with preparing a simple yet delicious Oreo cookie crust. Then, we’ll whip up a luxurious chocolate mousse that’s both rich and airy, before bringing it all together for a truly show-stopping dessert that requires no oven time at all.
- Prepare the Crust: In a medium bowl, combine the finely crushed Oreos with the melted butter. Stir until thoroughly mixed. This mixture should resemble damp sand.
- Form the Crust: Press the Oreo mixture firmly and evenly into the bottom and up the sides of a 9-inch pie plate. You can use the bottom of a glass or a measuring cup to help pack it down.
- Chill the Crust: Place the prepared pie crust in the freezer for at least 10 minutes to firm up while you prepare the filling.
- Make the Mousse Base: In a large bowl, beat the softened cream cheese with an electric mixer until smooth and creamy. Gradually beat in the confectioners’ sugar and cocoa powder until well combined and no lumps remain.
- Melt the Chocolate: In a separate microwave-safe bowl, melt the semi-sweet chocolate chips. Microwave in 30-second intervals, stirring between each, until smooth. Let it cool slightly.
- Combine Chocolate and Cream Cheese: Gradually beat the slightly cooled melted chocolate into the cream cheese mixture until fully incorporated and smooth. Stir in the vanilla extract.
- Whip the Cream: In another clean, dry bowl, whip the heavy cream with an electric mixer on medium-high speed until stiff peaks form. Be careful not to over-whip.
- Fold in Whipped Cream: Gently fold about one-third of the whipped cream into the chocolate cream cheese mixture to lighten it. Then, carefully fold in the remaining whipped cream until just combined and no streaks remain. You want to keep the mousse light and airy.
- Fill the Pie: Spoon the chocolate mousse filling evenly into the chilled Oreo crust, spreading it smoothly to the edges.
- Chill to Set: Cover the pie loosely with plastic wrap and refrigerate for at least 4 hours, or until the mousse is firm. For best results and a truly set mousse, chilling overnight is recommended.
- Add Topping (Optional): If desired, prepare a simple chocolate ganache by heating 1/2 cup heavy cream until simmering, then pouring it over 1 cup of semi-sweet chocolate chips. Let stand for 5 minutes, then whisk until smooth. Let cool slightly before spreading over the chilled mousse pie. Alternatively, simply top with whipped cream and extra Oreo crumbs.
- Serve: Once firm, slice the dreamy no-bake Oreo chocolate mousse pie and enjoy!
- Pro Tip: Ensure your cream cheese is fully softened for a super smooth mousse base, and don’t overmix once you start folding in the whipped cream; you want to preserve that lovely airy texture!
Recipe Tips
- Crust Consistency: Your crushed Oreo and butter mixture should feel like wet sand that holds together when squeezed. If it seems too dry, add another tablespoon of melted butter.
- Chocolate Smoothing: Make sure your melted chocolate has cooled slightly before adding it to the cream cheese mixture. Hot chocolate can cause the cream cheese to seize or become oily.
- Folding Technique: When folding the whipped cream into the chocolate base, use a spatula and gentle, sweeping motions from the bottom of the bowl upwards to maintain airiness.
- Chilling is Key: This no-bake pie relies on chilling to set properly. Don’t rush the process; allow ample time for the mousse to firm up for the best slicing and texture.
FAQs
- Can I make this pie with something other than Oreos? Yes, you can substitute other chocolate sandwich cookies for the crust. Just ensure they are crushed finely and mixed with melted butter.
- How long does this pie need to chill? It needs at least 4 hours to become firm enough to slice. For the best texture and to ensure it’s fully set, chilling overnight is highly recommended.
- What’s the best way to store leftovers? This Oreo chocolate mousse pie should be stored, covered, in the refrigerator. It will keep well for about 3 to 4 days.
- Can I freeze this pie? While you can freeze individual slices, the texture of the mousse might change slightly upon thawing. It’s best enjoyed fresh from the refrigerator.
Serving Suggestions
This delightful Oreo chocolate mousse pie is a showstopper on its own, but it pairs wonderfully with a variety of complementary treats. A dollop of freshly whipped cream is a classic addition that enhances its creamy richness. You could also serve it with a side of fresh berries, like raspberries or strawberries, to add a touch of brightness and acidity. For a truly decadent experience, a drizzle of extra chocolate sauce or a sprinkle of chocolate shavings on top is always a good idea.
Make This Recipe in Advance
The beauty of this no-bake pie is its make-ahead potential. You can prepare the Oreo crust and the chocolate mousse filling, assemble the pie, and then chill it in the refrigerator for up
Print
Dreamy No-Bake Oreo Chocolate Mousse Pie
- Total Time: 30 minutes plus chilling time
- Yield: 8-10 servings 1x
Description
Dreamy No-Bake Oreo Chocolate Mousse Pie – An absolute showstopper combining a crisp, chocolatey cookie crust with a luxuriously smooth and rich chocolate mousse filling. Perfect for any occasion, promising pure indulgence with every delightful bite.
Ingredients
For the crust
2 pkgs Oreo Cookies (14.03 oz), divided
8 tablespoons unsalted butter
For the chocolate layer
1 tablespoons cold water
1 teaspoon gelatin
5 ounces chocolate chips
1 cup plus 2 tablespoons heavy whipping cream, divided
3 tablespoons powdered sugar
4 ounces cream cheese, softened
For the Oreo mousse layer
1 tablespoons cold water
1 teaspoon gelatin
1 ¼ cup heavy whipping cream
¼ cup powdered sugar
10 Oreo cookies
For the topping
¾ cup heavy whipping cream
2 tablespoons powdered sugar
2 tablespoons hot fudge sauce
5 Oreo cookies
Instructions
For the crust:
1. Lightly grease the edges of a 9-inch springform pan and wipe with a paper towel.
2. Grind one package of Oreos into fine crumbs in a food processor or blender.
3. Melt 8 tablespoons of butter in the microwave, then pour over the cookie crumbs and stir until well coated.
4. Press the crumb mixture firmly into the bottom and up the sides of the springform pan to form a thick crust. Refrigerate while preparing the filling.
For the chocolate layer:
1. Chill a mixing bowl and whisk attachment for 5-10 minutes.
2. Sprinkle 1 teaspoon of gelatin over 1 tablespoon of cold water in a small dish and let it set for 2-3 minutes.
3. Combine chocolate chips and 2 tablespoons of heavy cream in a microwave-safe bowl. Microwave in 30-second intervals, stirring until melted.
4. Gently microwave the gelatin for 5-8 seconds until liquid, then stir it into the melted chocolate and set aside to cool.
5. Beat 1 cup plus 2 tablespoons of heavy cream with an electric mixer until bubbly. Gradually add 3 tablespoons of powdered sugar and continue beating until stiff peaks form.
6. Microwave softened cream cheese for 15 seconds until smooth. Use a paddle attachment to beat the cream cheese until completely smooth.
7. Add the melted chocolate mixture to the cream cheese and beat until combined, scraping the bowl as needed.
8. Gently fold in the whipped cream until no streaks remain. Pour the filling into the prepared crust, spread evenly, and refrigerate.
For the Oreo mousse layer:
1. Wash and dry your mixing bowl. Chill the bowl and whisk attachment for 5-10 minutes.
2. Sprinkle 1 teaspoon of gelatin over 1 tablespoon of cold water in a small dish and let it set for 2-3 minutes.
3. Gently microwave the gelatin for 3-5 seconds until liquid.
4. Beat 1 cup of heavy whipping cream in the chilled bowl until bubbly. Slowly add 1/4 cup of powdered sugar and continue beating until peaks start to form.
5. Slowly pour the liquid gelatin into the cream mixture while mixing until stiff peaks form.
6. Roughly chop 10 Oreo cookies. Fold the cookie pieces into the whipped cream mixture.
7. Pour the Oreo mousse over the chocolate layer and spread evenly. Refrigerate the pie for 3 to 4 hours until firm.
For the topping:
1. Chill a mixing bowl and whisk attachment for 5-10 minutes.
2. Beat 3/4 cup of heavy whipping cream in the chilled bowl until bubbly. Slowly add 2 tablespoons of powdered sugar and continue beating until stiff peaks form.
3. Pipe borders on the pie with the whipped cream.
4. Heat the hot fudge sauce and drizzle it over the pie.
5. Crush the remaining 5 Oreo cookies and sprinkle them over the top. Slice and serve. Keep refrigerated.
Notes
Crust Consistency: Your crushed Oreo and butter mixture should feel like wet sand that holds together when squeezed. If it seems too dry, add another tablespoon of melted butter.
Chocolate Smoothing: Make sure your melted chocolate has cooled slightly before adding it to the cream cheese mixture. Hot chocolate can cause the cream cheese to seize or become oily.
Folding Technique: When folding the whipped cream into the chocolate base, use a spatula and gentle, sweeping motions from the bottom of the bowl upwards to maintain airiness.
Chilling is Key: This no-bake pie relies on chilling to set properly. Don’t rush the process; allow ample time for the mousse to firm up for the best slicing and texture.
- Prep Time: 30 minutes
- Cook Time: N/A
- Category: Dessert
- Cuisine: American
Nutrition
- Calories: N/A
- Fat: N/A
- Carbohydrates: N/A
- Protein: N/A